Disclosure: This post contains affiliate links. As an Amazon Associate, we earn a small commission from qualifying purchases at no extra cost to you. We only recommend products we truly love and trust.
Dear readers, as someone deeply passionate about the world of babies and infants, I am excited to guide you through every single detail of crocheting baby booties in this article. I will break down the process step-by-step using a clear, simple, and easy-to-follow approach.

There is something profoundly special about creating a pair of soft, cozy booties for a newborn or toddler. Whether you are an absolute beginner picking up a hook for the very first time, an expectant parent preparing a nursery treasure, or a crafter searching for the ultimate baby shower gift, making handmade baby booties is one of the most rewarding endeavors in the crafting world.
Many beginner crocheters feel intimidated by shaping, heel turns, and tiny stitches. However, crafting baby footwear does not have to be complicated. With the right foundational techniques, clear row-by-row instructions, and suitable materials, you can easily complete a gorgeous, professional-looking pair of baby booties in under two hours!
In this comprehensive step-by-step guide, we will walk you through everything you need to know to succeed on your very first try. From selecting the safest yarn and mastering basic sizing to learning essential stitch mechanics and adding charming decorative finishes, this tutorial is designed to build your confidence and expand your creative skills. Let’s dive in and transform a simple skein of yarn into an adorable keepsake!
- Why Baby Booties Are the Ultimate Beginner Crochet Project
If you are new to the art of crochet, choosing the right starting project is critical for building momentum and avoiding frustration. While large projects like blankets can feel overwhelming and time-consuming, baby booties offer the perfect balance of quick satisfaction and essential skill-building.
Here is why baby booties are widely considered the ideal project for novice crafters:
Quick Completion Time: Unlike full-sized garments, a single baby bootie can be completed in 30 to 60 minutes. This provides instant gratification and keeps you motivated to complete the pair.
Minimal Material Investment: Small booties require very little yarn. A single 50g skein can yield multiple pairs, making this an extremely budget-friendly practice project.
Mastery of Core Stitches: This project allows you to practice essential foundational stitches—such as single crochet (sc), half double crochet (hdc), and basic decreases—on a small, manageable scale.
Portable & Convenient Crafting: Because the work is small, you can easily pack your yarn and hook in a small bag to practice while traveling, sitting in waiting rooms, or relaxing on the couch.
High Sentimentality & Marketability: Handmade baby booties are cherished keepsakes. They make deeply appreciated baby shower gifts and are among the best-selling handmade items on platforms like Etsy and craft fairs. - Choosing the Right Materials & Essential Tools
Selecting high-quality, appropriate materials is the secret to creating baby booties that are both visually appealing and comfortable against delicate infant skin. Newborn skin is notoriously sensitive, so yarn softness and safety must be your top priorities.
The Best Yarn Choice for Delicate Baby Feet
When working on footwear for babies, avoid scratchy wools, stiff acrylics, or textured novelty yarns that can irritate soft skin. Look for lightweight, breathable, and hypoallergenic yarns labeled as DK (Light Worsted, Weight 3) or Baby Sport Weight.
Combed Organic Cotton: Offers maximum breathability, soft texture, and zero skin irritation.
Milk Cotton / Bamboo Blends: Delivers superior silkiness, natural anti-bacterial properties, and high elasticity.
Baby Acrylics: Provide great stitch definition, durability, and easy machine-washability for busy parents.
👉 Click the link to check the price on Amazon
- Recommended Ergonomic Crochet Hooks & Accessories
Using the correct hook size ensures proper gauge, tension, and comfort for your hands. For baby booties, an E/4 (3.5 mm) or F/5 (4.0 mm) crochet hook is ideal for achieving a tight, neat stitch structure that keeps warmth in.
To prevent hand fatigue during repetitive stitches, we strongly recommend using an ergonomic soft rubber handle hook set.
👉 Click the link to check the price on Amazon
- Essential Toolkit Checklist:
Crochet Hook: 3.5 mm or 4.0 mm ergonomic hook.
Yarn Needle (Tapestry Needle): Blunt tip with a large eye for weaving in ends smoothly.
Stitch Markers: Essential for marking the center toe area during decrease rounds.
Measuring Tape: Soft flexible tape to check foot length and width accuracy.
Sharp Embroidery Scissors: For clean yarn cuts without fraying fibers. - Universal Baby Foot Sizing Chart
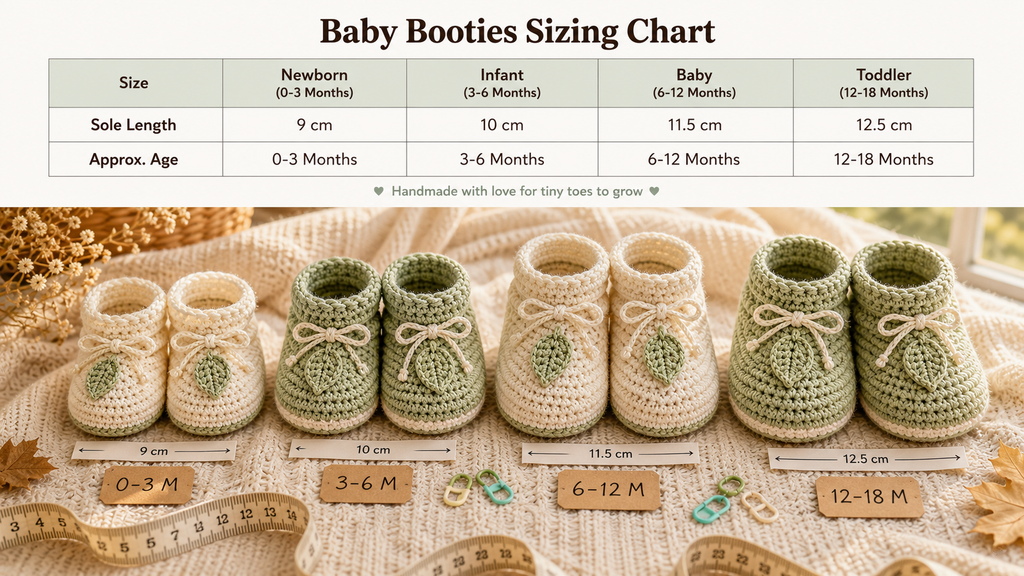
Achieving an accurate fit is crucial for ensuring that the booties stay secure on active baby feet without cutting off circulation or slipping off easily. Because baby feet vary significantly in size, use the structured chart below to select the appropriate sizing before beginning your foundation chain.
Standard Crochet Baby Booties Size Guide
| Age Range | Sole Length (Inches) | Sole Length (Centimeters) | Recommended Foundation Chain |
| Newborn (0 – 3 Months) | 3.5 in | 9.0 cm | 11 Chains |
| Infant (3 – 6 Months) | 4.0 in | 10.0 cm | 13 Chains |
| Baby (6 – 12 Months) | 4.5 in | 11.5 cm | 15 Chains |
| Toddler (12 – 18 Months) | 5.0 in | 12.5 cm | 17 Chains |
Pro Crafter Tip: Always measure the baby’s foot from the back of the heel to the tip of the longest toe if the baby is present. If you are crafting a gift prior to birth, the 0–3 Months size (3.5 inches / 9.0 cm) is the safest standard benchmark!
- Step-by-Step Easy Crochet Baby Bootie Pattern & Construction
Now that you have your yarn, ergonomic hooks, and precise measurements ready, it is time to start bringing your baby booties to life. This original pattern uses standard US crochet terminology and is intentionally broken down into three distinct, manageable structural components: the Sole, the Upper Foot, and the Ankle Cuff. - BOOTIE STRUCTURE
- [ 3. Ankle Cuff / Ribbing ]
- [ 2. Upper Foot & Decreases ]
- [ 1. Sturdy Foundation Sole ]
Step 1: Crocheting the Sturdy Foundation Sole
The foundation of a well-fitting bootie begins at the sole. To create an oval shape, we will work in continuous joined rounds around both sides of a central foundation chain.
Round 1 (Foundation Setup): Start with a slip knot and chain 12 (specifically tailored for the 0–3 months size). Working into the back bumps of the second chain from your hook, make 2 single crochets (sc) in that first stitch to begin the curve. Work 1 sc in each of the next 9 chain stitches down the spine. In the very last chain stitch, make 4 sc all into the same space; this creates a smooth turning curve for the toe area. Now, rotate your work to craft along the opposite side of the foundation chain: work 1 sc in each of the next 9 stitches, and place 2 sc in the final chain space. Join with a tight slip stitch (sl st) to the top of your very first sc. (Total Stitch Count: 26 stitches)
Round 2 (Adding Width & Heel Depth): Chain 1 (does not count as a stitch here or throughout). Make 2 half double crochets (hdc) in each of the first 2 stitches to expand the heel curve. Work 1 hdc in each of the next 9 stitches along the straight side. To round out the wide toe section, place 2 hdc in each of the next 4 stitches. Work 1 hdc in each of the next 9 stitches down the opposite side, and end with 2 hdc in each of the remaining 2 stitches. Join with a sl st to the first hdc. (Total Stitch Count: 34 stitches)
Round 3 (Finalizing the Oval Sole Base): Chain 1. Work [1 sc in the next stitch, 2 sc in the following stitch] twice to finish shaping the back heel. Work 1 sc in each of the next 9 stitches. Across the front toe area, work [1 sc in the next stitch, 2 sc in the following stitch] 4 consecutive times. Work 1 sc in each of the next 9 stitches. Finish the round by working [1 sc in the next stitch, 2 sc in the following stitch] twice. Join with a sl st to the initial stitch. Fasten off if you plan to switch yarn colors for the upper section, or keep your working yarn attached for a seamless monochromatic look. (Total Stitch Count: 42 stitches)
Step 2: Working the Upper Foot & Shaping Toe Decreases
With the flat oval sole completed, we will now build upwards to create the vertical walls of the bootie and shape the iconic sloping front toe section.
Round 4 (Creating the Ridge – Back Loops Only): Attach your yarn at the exact center back heel stitch. Chain 1, and working exclusively in the Back Loops Only (BLO) around the entire sole edge, make 1 single crochet in every single stitch. This specialized loop placement forces the stitches upward at a clean 90-degree angle, creating a clear visual border between the sole and the shoe body. Join with a sl st. (Total Stitch Count: 42 stitches)
Round 5 (Building Side Wall Height): Chain 1. Working through both standard loops as normal, place 1 single crochet in every stitch around the perimeter. Join with a sl st. This adds comfortable vertical depth for tiny baby feet. (Total Stitch Count: 42 stitches)
Round 6 (The First Critical Toe Decrease Round): Chain 1. Work 1 sc in each of the first 13 stitches to reach the front instep. Place a stitch marker here. Now, perform the toe decreases across the front: [Single Crochet 2 Stitches Together (sc2tog)] 8 consecutive times. Remove the marker, then work 1 sc in each of the remaining 13 stitches around to the heel. Join with a sl st. This dramatically draws the front yarn together, forming the rounded front shoe pocket. (Total Stitch Count: 34 stitches)
Round 7 (Refining the Instep Curve): Chain 1. Work 1 sc in each of the first 11 stitches. Perform [sc2tog] 6 consecutive times across the central front toe space. Work 1 sc in each of the remaining 11 stitches to the end of the round. Join with a sl st. Your bootie now clearly resembles a complete shoe! (Total Stitch Count: 28 stitches)
Step 3: Crafting the Ankle Cuff & Fastening Off
The final structural part of the bootie is the flexible, stretchy ankle cuff that keeps the footwear securely in place during movement.
Round 8 (Cuff Foundation): Chain 2 (counts as your first half double crochet). Work 1 hdc into every stitch around the top opening. Join with a sl st to the top of the initial chain 2. (Total Stitch Count: 28 stitches)
Rounds 9–11 (Flexible Ribbed Texture): Chain 2. Work an alternating ribbing pattern around the cuff: [Front Post Half Double Crochet (FPHdc) in the first stitch, Back Post Half Double Crochet (BPHdc) in the next stitch]. Repeat this alternating post sequence all the way around the ankle opening for 3 complete rounds. This creates an elastic, sweater-like collar that expands gently over chubby ankles without leaving red marks on the skin.
Finishing Up: Slip stitch into the final stitch, cut your yarn leaving a generous 8-inch tail, and pull the thread through to secure the final knot.
👉 Click the link to check the price on Amazon

Adding Professional Finishes & Charming Details
The primary difference between a quick homemade craft and a boutique-quality newborn piece lies in the finishing details. Spending an extra ten minutes executing clean finishing techniques instantly elevates your handmade work
Weaving in Loose Yarn Ends Securely: Because these booties are intended for delicate infants, loose internal threads pose a tripping or snagging hazard. Thread your yarn tail onto a blunt-tipped tapestry needle and weave it back and forth through dense hidden stitches in three alternating directions. Trim the excess thread flush with the fabric surface.
Attaching Rustic Wooden Decorative Buttons: Sewing small, natural wood or coconut-shell decorative buttons onto the outer ankle cuff provides a timeless handmade aesthetic. Always use heavy-duty polyester sewing thread and double-knot the buttons securely on the interior side so they cannot be pulled free by curious little hands.
👉 Click the link to check the price on Amazon
Adding Soft Adjustable Satin Bow Ties: Threading a thin 6mm satin ribbon through the spaces in Round 8 allows parents to gently adjust and cinch the ankle fit while tying an adorable decorative bow on the front or side.
Troubleshooting Common Beginner Crochet Mistakes
Even when following a clear tutorial, beginner crafters occasionally run into minor execution issues. Here are the most frequent challenges and how to solve them effortlessly:
Problem 1: My bootie sole curls inward like a deep bowl instead of laying flat.
Root Cause: Your foundation chain tension was pulled too tightly, or you accidentally skipped increase stitches along the outer curves of Rounds 1 or 2.
Quick Solution: Frog (unravel) back to Round 1, consciously relax your hand tension, or switch to a hook that is 0.5 mm larger specifically for the foundation chain setup.
Problem 2: One completed bootie looks noticeably larger than its twin.
Root Cause: Natural shifts in hand tension caused by fatigue, changing seating positions, or working on the project across different days.
Quick Solution: Try to crochet both soles first before building the uppers, or complete the entire pair within the same crafting session to keep your physical stitch tension consistent.
Problem 3: The ankle cuff opening is too stiff to fit over the baby’s heel.
Root Cause: Working the post stitches (FPHdc / BPHdc) too tightly during the cuff rounds.
Quick Solution: Use a crochet hook one size larger specifically for Rounds 9 through 11 to ensure maximum stretchiness and flexibility around the ankle joint.

Looking for more complete patterns, row-by-row guides, and matching baby hat sets? Check out our complete 100-page e-book: The Ultimate Crochet Baby Booties, Hats & Keepsakes Masterclass. It includes step-by-step instructions, baby-safe material guides, and exclusive patterns for newborns and toddlers!
Conclusion: Start Your Baby Bootie Journey Today!
Creating handmade items for little ones is more than just a craft—it is a labor of love that weaves warmth, care, and creativity into every single stitch. As we have explored in this comprehensive guide, crafting your very first pair of baby booties doesn’t have to be intimidating. By following our step-by-step instructions, choosing the right hypoallergenic yarns, and maintaining steady tension, you can easily transform a simple ball of yarn into a stunning, boutique-quality keepsake.
Whether you are crafting a cozy pair for your own little one, preparing a heartfelt baby shower gift, or building stock for your online handmade shop, the joy of completing this project is entirely unmatched.
Don’t let hesitation stop you—grab your ergonomic hooks, pick your favorite soft pastel yarn, and start stitching your very first pair today. Your creative journey into the wonderful world of baby crochet awaits!
🎃 Looking for Festive & Seasonal Baby Footwear?
If you enjoyed this tutorial and want to explore ready-made or themed options for the cozy autumn season, check out our guide on the Top 6 Soft & Non-Slip Crochet Baby Booties for Halloween! It features adorable pumpkin patches, friendly ghost designs, and soft non-slip options for baby’s first Halloween photo shoot.