Disclosure: This post contains affiliate links. As an Amazon Associate, we earn a small commission from qualifying purchases at no extra cost to you. We only recommend products we truly love and trust.
As a baby and toddler enthusiast, in this article, I will guide you through all the steps you need to craft the perfect pair of handmade sneakers for your little ones
There is nothing quite as adorable as tiny baby shoes, and when they are handmade, they become instant family heirlooms. If you are looking for the perfect DIY baby shower gift or a stylish accessory for your own little one, learning how to crochet high-top baby sneakers is an incredibly rewarding project. Unlike stiff store-bought shoes, these crocheted booties offer maximum comfort, stretch to accommodate growing feet, and most importantly, they actually stay on!
In this comprehensive, step-by-step guide, we will walk you through everything you need to know to create trendy, comfortable crochet high-top baby sneakers. From selecting the safest, softest yarn to mastering the exact stitch counts for different sizes, this free pattern is designed with both ambitious beginners and seasoned crocheters in mind. Grab your favorite hook, and let us start stitching the cutest footwear your baby will ever wear.

Why Choose High-Top Crochet Sneakers for Babies?
When it comes to baby footwear, the high-top sneaker design is not just about making a fashion statement—it is rooted in practicality and baby safety.
First, standard low-cut booties are notoriously difficult to keep on a kicking baby. The high-top design wraps securely around the ankle, ensuring that the shoe stays firmly in place, whether the baby is resting in a crib or crawling across the living room floor. Second, crocheted laces (rather than real strings or buttons) allow you to tighten the shoe perfectly to the baby’s unique ankle width without creating a choking hazard. Finally, the soft structure of crochet allows for natural foot development. Pediatricians highly recommend soft-soled shoes for infants, as rigid shoes can restrict the natural spreading of toes required for balance.
Essential Materials and Tools
To achieve the best results, gathering the right materials is crucial. Because these sneakers will be close to sensitive newborn skin and will inevitably end up in the baby’s mouth, your yarn choice matters immensely.
Here is exactly what you will need to complete this project:
Yarn (Main Color): 1 skein of DK weight (Light 3) or Worsted weight (Medium 4) yarn. We highly recommend a 100% cotton or a cotton-bamboo blend. Cotton provides excellent stitch definition, holds the structural shape of a sneaker much better than slippery acrylic, and is breathable for tiny feet.
Yarn (Contrast Color): 1 skein of white cotton yarn for the iconic sneaker sole and the laces.
Crochet Hook: A 3.5 mm (E/4) or 4.0 mm (G/6) ergonomic crochet hook, depending on your tension.
Tapestry Needle: A large-eye blunt needle for weaving in ends safely.
Stitch Markers: Essential for marking the beginning of rounds and the toe-box decreases.
Small Scissors: For clean yarn cuts.
Text to hyperlink: Looking for the perfect breathable yarn? We highly recommend using a premium, hypoallergenic 100% Cotton Yarn, available on Amazon in dozens of beautiful baby-safe colors. It provides the perfect stiffness to keep your sneakers shaped perfectly.
👉 Click the link to check the price on Amazon
The Ultimate Baby Bootie Sizing Guide
Babies grow at astonishingly different rates, making standard sizing a bit tricky. The best way to ensure a perfect fit is to measure the baby’s foot from the tip of the longest toe to the base of the heel, then add about 0.25 to 0.5 inches for “wiggle room.”
If you are making these as a surprise gift and cannot measure the baby, use our standard sizing chart below to adjust your foundation chain and hook size.
| Baby Age / Size | Average Foot Length (Inches) | Average Foot Length (cm) | Recommended Hook Size |
| Preemie / Newborn | 3.0″ – 3.25″ | 7.5 – 8.0 cm | 3.0 mm |
| 0 – 3 Months | 3.25″ – 3.5″ | 8.5 – 9.0 cm | 3.5 mm (E) |
| 3 – 6 Months | 3.75″ – 4.0″ | 9.5 – 10.0 cm | 4.0 mm (G) |
| 6 – 9 Months | 4.25″ – 4.5″ | 11.0 – 11.5 cm | 4.5 mm (7) |
| 9 – 12 Months | 4.5″ – 4.75″ | 11.5 – 12.0 cm | 5.0 mm (H) |
Note on Gauge: To increase the size of the shoe without changing the pattern mathematically, simply go up half a hook size. To make it smaller, go down half a hook size. Tension is everything in shoe making!
Text to hyperlink: Crocheting tight stitches for baby shoes can cause wrist pain. Upgrade your crafting experience with this top-rated Ergonomic Crochet Hook Set on Amazon to keep your hands comfortable through every row.
👉 Click the link to check the price on Amazon
Abbreviations & Pattern Notes (US Terms)
Before we dive into the pattern, let’s review the standard US crochet terminology used in this tutorial:
Ch: Chain
St(s): Stitch(es)
Sl St: Slip Stitch
Sc: Single Crochet
Hdc: Half Double Crochet
Dc: Double Crochet
Sc2tog: Single Crochet two together (Decrease)
BLO: Back Loop Only
Pattern Note: You will be working in joined rounds for the sole and the lower body of the shoe. This means you will slip stitch to the first stitch of the round at the end of each round, and then chain up to start the next. The starting chain does not count as a stitch unless explicitly stated.
Step 1: Crocheting the Sneaker Sole
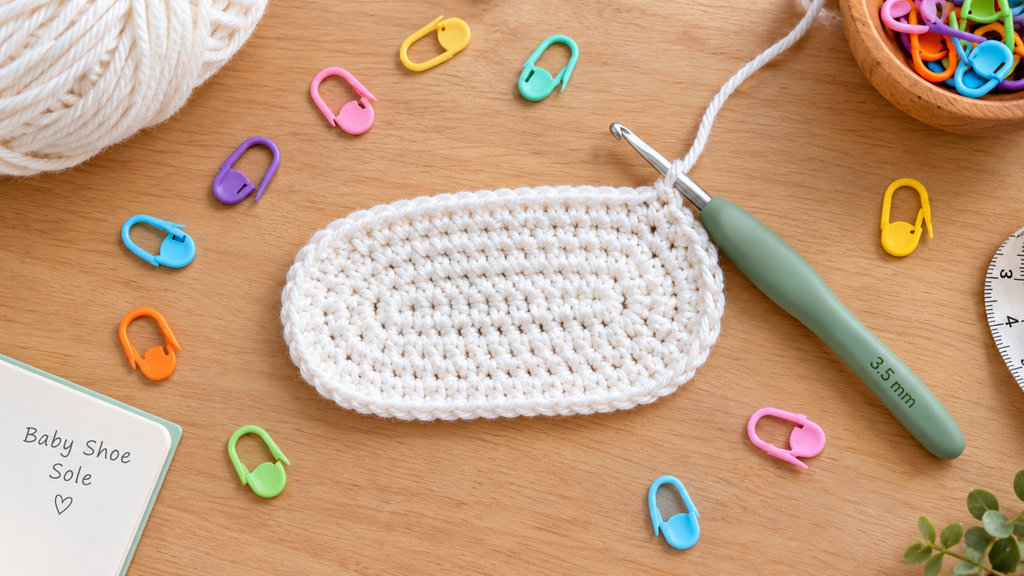
The foundation of any great crochet shoe is a flat, structurally sound sole. We will create an oval shape by working around both sides of a foundation chain. Use your White Contrast Yarn for this section.
Round 1:
Chain 11.
Working into the 2nd chain from your hook, place 2 Hdc in that same stitch.
Place 1 Hdc in each of the next 8 chains.
In the very last chain, place 5 Hdc. (This creates the curve for the toe).
Now, working down the opposite, unworked side of the foundation chain: place 1 Hdc in each of the next 8 chains.
Place 2 Hdc in the last chain (the same chain where you started).
Join with a Sl St to the first Hdc of the round. (Total: 25 sts)
Round 2:
Chain 1.
Place 2 Hdc in each of the first 2 stitches.
Place 1 Hdc in each of the next 8 stitches.
Place 2 Hdc in each of the next 5 stitches (This turns the toe smoothly).
Place 1 Hdc in each of the next 8 stitches.
Place 2 Hdc in each of the last 2 stitches.
Join with a Sl St to the first Hdc. (Total: 34 sts)
Round 3:
Chain 1.
1 Hdc in the first st, 2 Hdc in the next st – repeat this 2 times.
1 Hdc in the next 8 sts.
1 Hdc in the next st, 2 Hdc in the next st – repeat this 5 times around the toe.
1 Hdc in the next 8 sts.
1 Hdc in the next st, 2 Hdc in the next st – repeat this 2 times.
Join with a Sl St to the first Hdc. (Total: 43 sts)
Your sole is now complete! It should lay perfectly flat and look like a neat little oval. Take a moment to measure the length of this oval against the sizing chart above to ensure your tension is correct before moving on to the body of the shoe.
Text to hyperlink: Counting stitches around the toe curve can be tricky. Use these vibrant Locking Stitch Markers from Amazon to mark your corners and decreases so you never lose your place in the pattern.
👉 Click the link to check the price on Amazon
Step 2: Building the Shoe Body (The Crucial Transition)
Now that your white sole is perfectly flat and measures correctly against our sizing chart, it is time to build the vertical walls of the sneaker. This transition is what separates a flat slipper from a structured high-top shoe. We will create a crisp, distinct line between the sole and the shoe body using a specific crochet technique.
Round 4 (Creating the Sole Edge):
Do not change your yarn color yet; continue with the White Contrast Yarn.
Chain 1.
For this entire round, you will work in the Back Loop Only (BLO). If you look at the top of your stitches, they look like little “V”s. Insert your hook only into the loop furthest away from you.
Place 1 Single Crochet (Sc) in the BLO of every single stitch all the way around.
Join with a Sl St to the first Sc. (Total: 43 sts).
Notice how this creates a sharp, 90-degree angle, folding the work upward to form the shoe wall.
Round 5:
Chain 1.
Place 1 Sc in both loops of every stitch around.
Join with a Sl St to the first Sc. (Total: 43 sts).
Fasten off the White yarn and weave in the end securely.
Round 6 (Adding the Main Color):
Attach your Main Color yarn (the primary color of your sneaker) anywhere at the back heel of the shoe.
Chain 1.
Place 1 Sc in every stitch all the way around.
Join with a Sl St to the first Sc. (Total: 43 sts).

Text to hyperlink: When changing colors frequently, clean cuts are essential. We love using these sharp, vintage-style Precision Crafting Scissors from Amazon to snip yarn ends perfectly flush without fraying the cotton fibers.
👉 Click the link to check the price on Amazon
Step 3: Shaping the Toe Box (The Decreases)
This is the most exciting part of the pattern, where your oval tube magically transforms into a recognizable shoe. We will use decrease stitches to pull the front of the shoe inward over the toes.
Round 7:
Chain 1.
Place 1 Sc in the first 12 stitches.
Now, we will start the toe decreases: Work 1 Half Double Crochet Decrease (Hdc2tog) a total of 9 times across the front toe section. (To Hdc2tog: Yarn over, insert hook into next st, pull up a loop, yarn over, insert hook into the following st, pull up a loop, yarn over and pull through all 5 loops on the hook).
After your 9 decreases, place 1 Sc in the remaining 13 stitches.
Join with a Sl St to the first Sc. (Total: 34 sts).
Round 8:
Chain 1.
Place 1 Sc in the first 11 stitches.
Work 1 Double Crochet Decrease (Dc2tog) a total of 6 times across the toe box. (Using Double Crochet decreases here creates a sharper, more dramatic inward curve).
Place 1 Sc in the remaining 11 stitches.
Join with a Sl St to the first Sc. (Total: 28 sts).
Your toe box is now fully shaped! The front of the shoe should curve neatly inward, leaving an opening at the top for the baby’s foot.
Step 4: Crafting the Sneaker Tongue
Unlike the base of the shoe, which is worked in continuous rounds, the tongue is worked in flat rows back and forth.
- Locate the Center: Look at the front of your shoe. Identify the center 8 stitches right across the top of the toe box. Place a stitch marker in the first and eighth stitch.
- Row 1: Attach your Main Color yarn to the right-most marked stitch. Chain 1. Place 1 Sc in the same stitch and in the next 7 stitches across the front. (Total: 8 sts).
- Rows 2 through 8: Chain 1, turn your work. Place 1 Sc in each of the 8 stitches.
- Row 9 (Rounding the top): Chain 1, turn. Skip the first stitch, place 1 Sc in the next 6 stitches, skip the last stitch. (Total: 6 sts).
Fasten off and weave in the end. The tongue should now stick up straight, ready to rest against the front of the baby’s ankle.
Step 5: The High-Top Ankle Wrap and Eyelets
Now we will build the sides and back of the shoe, which wrap around the ankle and hold the sneaker securely on the baby’s foot. We will also create the “eyelets” (small holes) for the shoelaces.
Row 1:
Attach your Main Color yarn to the stitch immediately to the left of the tongue.
Chain 1.
Place 1 Sc in every unworked stitch around the heel until you reach the right side of the tongue. Do NOT crochet into the tongue itself. (You should have 20 Sc).
Row 2 (Creating the First Eyelets):
Chain 1, turn your work.
Place 1 Sc in the first stitch. Chain 1, skip the next stitch (this creates the first lace hole).
Place 1 Sc in each stitch around the heel until you have 2 stitches left.
Chain 1, skip the next stitch (creating the second lace hole). Place 1 Sc in the very last stitch.
Rows 3 & 4:
Chain 1, turn. Place 1 Sc in every stitch and every chain-1 space across.
Row 5 (Creating the Second Eyelets):
Repeat the exact same process as Row 2 to create the second set of lace holes higher up on the ankle.
Rows 6 & 7:
Chain 1, turn. Place 1 Sc in every stitch and chain-1 space across. Fasten off and weave in your ends neatly.

Step 6: The Signature Details (Star Logo and Laces)
What makes a high-top sneaker instantly recognizable? The classic round logo patch on the inner ankle!
The Logo Patch:
Using your White Contrast Yarn, make a Magic Ring.
Chain 2. Place 10 Hdc into the Magic Ring. Pull the ring completely tight so there is no hole in the center. Join with a Sl St to the first Hdc. Fasten off, leaving a long 8-inch tail.
Using a tapestry needle, carefully sew this white circle to the outer side of the high-top ankle wrap. For an extra authentic touch, you can use a tiny piece of black yarn to stitch a small star in the center of the white circle.
The Shoelaces:
Never use real string, ribbon, or store-bought shoelaces for baby booties, as they can unravel or pose a safety risk. Crocheted laces are slightly stretchy, soft, and completely safe.
Using your White Contrast Yarn, simply Chain 100. Fasten off.
Tie a small, tight knot at both ends of the chain and trim the excess yarn closely.
Thread your handmade lace through the eyelets you created in the ankle wrap, crisscrossing them over the tongue just like a real pair of sneakers. Tie them in a secure double bow.
Text to hyperlink: Sewing small details like the logo patch requires the right tools. Grab a pack of these Large-Eye Blunt Tapestry Needles from Amazon to make assembling your crochet baby shoes incredibly easy and safe.
👉 Click the link to check the price on Amazon
Step 7: Final Safety Checks and Care Instructions
Before gifting your handmade sneakers, perform a quick safety check. Pull gently on the logo patch and the shoelaces to ensure they are firmly attached and cannot be pulled loose by curious little fingers. Double-check that all yarn tails inside the shoe are woven in securely so they do not wrap around the baby’s toes.
Because these sneakers are made of cotton, they are wonderfully easy to care for.
Washing: Machine wash on a gentle, cold cycle inside a mesh laundry bag.
Drying: Always air dry. Lay the sneakers flat and stuff the toes with a little bit of tissue paper or a clean washcloth while they are wet; this helps them retain their perfect 3D shoe shape as they dry!
Text to hyperlink: Keep handmade baby items looking brand new! We highly recommend washing your crochet shoes inside these Durable Mesh Laundry Bags from Amazon to prevent snagging and maintain their adorable shape in the washing machine.
👉 Click the link to check the price on Amazon
By following this step-by-step pattern, you have just created a gorgeous, practical, and highly impressive pair of crochet high-top baby sneakers. Whether you make them in classic white and black, vibrant pastel pink, or trendy mustard yellow, they are guaranteed to be the star of the next baby shower you attend. Happy crocheting!

Now, I hope I have helped you learn how to make this type of shoes. Thank you for reading the article!