Disclosure: This post contains affiliate links. As an Amazon Associate, we earn a small commission from qualifying purchases at no extra cost to you. We only recommend products we truly love and trust.
As someone interested in handmade children’s clothing, in this article, we will explore how to make a cozy children’s sweater by hand. We will walk you through the essential steps and explain what you need to know to create a beautiful and comfortable sweater for your child.
There is a unique kind of magic in creating something warm and beautiful for a new baby with your own two hands. Whether you are an expecting mother nesting in preparation for your little one, a grandmother looking for the perfect heirloom gift, or simply a craft enthusiast, crocheting baby clothes is an incredibly fulfilling journey. If you have been searching for a charming crochet baby cardigan pattern that is actually easy enough for absolute beginners, you are in exactly the right place.
Many modern crochet sweater patterns require complex seaming, sewing multiple panels together, and dealing with frustrating armhole shaping. This free pattern changes all of that. Designed specifically for beginners, this baby cardigan is crocheted from the top down in one continuous piece. That means there is absolutely zero sewing required to assemble the body and sleeves! By the time you finish the final row, you only need to weave in your yarn ends and attach a few cute buttons.
In this comprehensive, two-part guide, we will walk you through everything you need to craft a cozy, boutique-quality cardigan for babies ranging from newborn all the way to 12 months.

Why This Beginner Baby Cardigan is the Perfect Project
If you can master basic crochet stitches like the Single Crochet (Sc) and Double Crochet (Dc), you can absolutely make this sweater.
The seamless, top-down “raglan” construction used in this pattern is widely considered the best technique for baby garments. You begin by crocheting a square neckline, and as you work in rows, you slowly increase the stitch count at four specific corners. These corners effortlessly create the front panels, the back panel, and the spaces for the sleeves all at the same time. Not only does this save hours of frustrating assembly, but it also creates a smoother, more comfortable interior for the baby, free from bulky sewn seams that might irritate delicate skin.
Furthermore, a cardigan is practically a necessity in a newborn’s wardrobe. Unlike pullover sweaters that must be stretched awkwardly over a baby’s fragile head—often leading to tears—a cardigan slips easily over the arms and buttons up the front, making dressing and diaper changes completely stress-free for parents.
Essential Materials & Tools You Will Need
To achieve that soft, squishy, and professional look, gathering the right supplies is essential. Because babies have highly sensitive skin and make plenty of messes, your yarn must be both hypoallergenic and machine washable.
Here is your complete material list for this project:
Yarn: 1 to 2 skeins (approx. 300 – 450 yards) of Premium DK Weight (Light 3) baby yarn. We highly recommend a high-quality acrylic and cotton blend. Acrylic provides durability and easy washing, while cotton offers breathability.
Crochet Hook: A 4.0 mm (G/6) ergonomic crochet hook to maintain comfortable tension.
Buttons: 3 to 4 small wooden or resin buttons (approx. 15mm or 5/8 inch in diameter).
Stitch Markers: 4 locking stitch markers are absolutely critical for tracking your raglan corners.
Extras: A large-eye tapestry needle for weaving in ends, and small crafting scissors.
Text to hyperlink: Choosing the right yarn is the secret to a professional-looking sweater. We highly recommend this Premium DK Weight Baby Yarn on Amazon—it is ultra-soft, completely hypoallergenic, and stands up perfectly to frequent washing.
👉 Click the link to check the price on Amazon
Baby Cardigan Sizing Guide (0-12 Months)
Tension and yarn choices can cause handmade items to vary slightly in size. To ensure your cardigan fits perfectly, reference our sizing chart below. We have provided the finished chest circumference for each age bracket. If you are crocheting this as a baby shower gift and are unsure of the size, the 3-6 month size is universally the most practical choice, as babies grow out of newborn sizes in just a few weeks.
| Baby Age / Size | Finished Chest Circumference | Cardigan Length (Shoulder to Hem) | Recommended Hook Size |
| Newborn (0-3 Mos) | 16 inches (40.5 cm) | 9 inches (23 cm) | 4.0 mm (G/6) |
| 3 – 6 Months | 18 inches (46 cm) | 10.5 inches (26.5 cm) | 4.0 mm (G/6) |
| 6 – 9 Months | 19 inches (48 cm) | 11.5 inches (29 cm) | 4.5 mm (7) |
| 9 – 12 Months | 20 inches (51 cm) | 12.5 inches (32 cm) | 4.5 mm (7) |
Sizing Pro-Tip: The pattern below is written mathematically for the 0-6 month range. To seamlessly scale up to the 6-12 month sizes without complex math, simply follow the same stitch pattern but switch to a slightly thicker Worsted Weight (Medium 4) yarn and use a 4.5 mm or 5.0 mm hook. This will organically increase the overall dimensions of the cardigan!
Text to hyperlink: Add a boutique-quality finishing touch to your baby cardigan with these adorable Natural Wooden Craft Buttons from Amazon. They are perfectly sized for baby clothing and slide easily through crochet buttonholes.Text to hyperlink: Add a boutique-quality finishing touch to your baby cardigan with these adorable Natural Wooden Craft Buttons from Amazon. They are perfectly sized for baby clothing and slide easily through crochet buttonholes.
👉 Click the link to check the price on Amazon
Abbreviations and Important Pattern Notes (US Terms)
Familiarize yourself with these standard US crochet terms before starting:
Ch: Chain
St(s): Stitch(es)
Sl St: Slip Stitch
Sc: Single Crochet
Dc: Double Crochet
V-Stitch (The Corner Increase): (1 Dc, Chain 1, 1 Dc) all placed into the same stitch or chain space. This is how we expand the sweater.
Pattern Note: This entire yoke (the chest and shoulders) is worked back and forth in rows. The starting Chain 2 at the beginning of a row does not count as a stitch. Always place your first Double Crochet of the row into the very first stitch at the base of your starting chain.
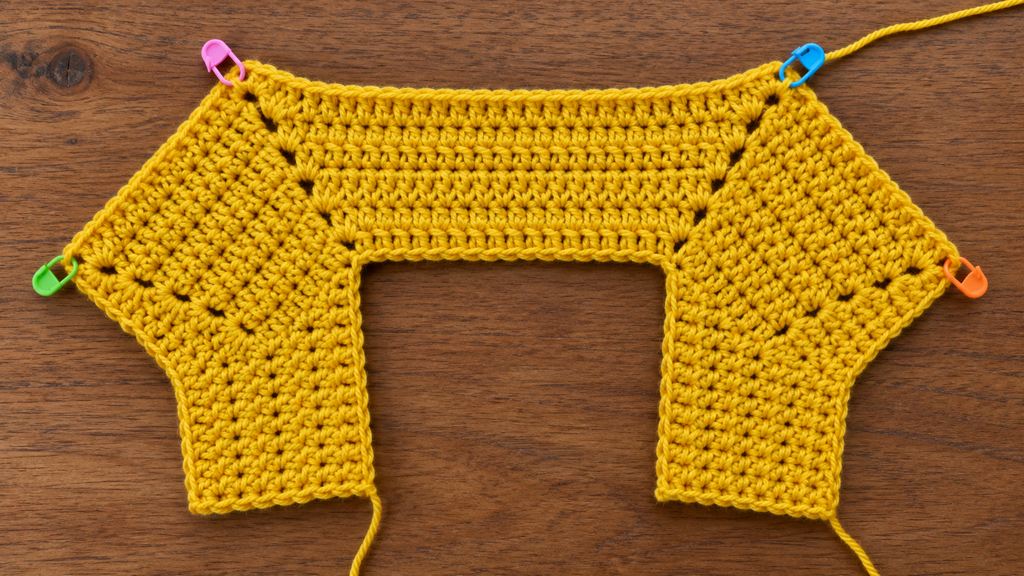
Step 1: Crocheting the Cardigan Yoke (Neck & Shoulders)
We begin at the neckline. In this section, we will establish the four “raglan corners” that will separate the front right panel, the right sleeve, the back panel, the left sleeve, and the front left panel.
Foundation Row (The Neckline):
Leaving a long tail for weaving in later, Chain 55.
Row 1 (Setting up the panels):
Place 1 Dc in the 3rd chain from your hook.
Place 1 Dc in each of the next 6 chains. (This forms the first front panel).
Create Corner 1: In the next chain, place (1 Dc, Ch 1, 1 Dc). Place a stitch marker directly into that Ch-1 space you just made.
Place 1 Dc in each of the next 9 chains. (This forms the first shoulder/sleeve).
Create Corner 2: In the next chain, place (1 Dc, Ch 1, 1 Dc). Place a stitch marker in the Ch-1 space.
Place 1 Dc in each of the next 15 chains. (This forms the back panel).
Create Corner 3: In the next chain, place (1 Dc, Ch 1, 1 Dc). Place a stitch marker in the Ch-1 space.
Place 1 Dc in each of the next 9 chains. (This forms the second shoulder/sleeve).
Create Corner 4: In the next chain, place (1 Dc, Ch 1, 1 Dc). Place a stitch marker in the Ch-1 space.
Place 1 Dc in each of the last 7 chains. (This forms the second front panel).
You should now have a distinct square “U” shape lying flat.
Row 2 (Expanding the Yoke):
Chain 2, turn your work.
Place 1 Dc in every stitch across until you reach your first stitch marker (the Ch-1 space).
Into the Ch-1 space, place your V-Stitch: (1 Dc, Ch 1, 1 Dc). Move your stitch marker up into this new Ch-1 space.
Continue placing 1 Dc in every stitch until you reach the next stitch marker. Place a V-Stitch (1 Dc, Ch 1, 1 Dc) in the marked space, moving the marker up.
Repeat this process across the entire row, placing 1 Dc in every normal stitch and a V-Stitch in every corner.
Rows 3 through 9:
Repeat the exact instructions from Row 2. With each row, you will notice the panels growing wider and the armholes becoming deeper. By the end of Row 9, the yoke should fold perfectly in half to resemble the top section of a tiny sweater.
Checkpoint: Measure the depth of your armhole (from the neckline straight down to the corner stitch marker). It should measure approximately 4 inches for a 0-3 month size, or 4.5 inches for a 3-6 month size. If it is too small, simply add one or two more repeat rows before moving on to splitting the sleeves!
Completing Your Charming Crochet Baby Cardigan
Welcome back to the second part of our beginner-friendly baby cardigan tutorial! In Part 1, we successfully constructed the yoke, which serves as the neck and shoulders of the sweater. If you look at your piece right now, it should resemble a small cape with four distinct corners marked by your stitch markers. Now, we are ready for the most exciting part of this top-down raglan design: separating the sleeves from the body. This magical step transforms that flat yoke into a recognizable, wearable sweater without a single drop of sewing! Let us dive right into completing this heirloom-quality garment for the little one in your life.
Step 2: The Magic Step – Separating the Sleeves
The technique we use here is what makes top-down crochet so popular among modern crafters. We are going to crochet across the front panel, completely skip over the stitches meant for the sleeve, and connect directly to the back panel. It sounds complicated, but it is actually incredibly simple once you have the hook in your hands.
Row 10 (The Separation Row):
- Chain 2 and turn your work.
- Place 1 Double Crochet (Dc) in each stitch across the first front panel until you reach the very first stitch marker.
- Place 1 Dc directly into the marked Chain-1 space.
- Here is the magic: Chain 3 (this creates the underarm area). Completely skip all the stitches between your first stitch marker and your second stitch marker. These skipped stitches form your first armhole!
- Place 1 Dc directly into the second marked Chain-1 space.
- Continue placing 1 Dc in each stitch across the entire back panel until you reach the third stitch marker.
- Place 1 Dc into the third marked Chain-1 space, Chain 3, and skip all the stitches until the fourth stitch marker. (This creates the second armhole).
- Place 1 Dc into the fourth marked Chain-1 space, and finish the row by placing 1 Dc in each remaining stitch of the second front panel.
Your cardigan now has distinct armholes and a connected body! You can go ahead and remove all four stitch markers; you will not need them for the corners anymore.

Step 3: Crocheting the Main Body of the Cardigan
Now that the upper body is connected, the rest of the torso is incredibly relaxing and repetitive. It is the perfect mindless project to work on while watching your favorite show or listening to a podcast.
Rows 11 to 20 (Or until desired length):
Chain 2, turn your work. Place 1 Dc in every single stitch across the entire row. When you reach the underarm area (the Chain-3 spaces we made in the previous step), simply place 1 Dc into each of the 3 chains, and continue crocheting across the back panel.
Continue repeating this simple row until the cardigan reaches your desired length. For a newborn to 3-month size, you will want the total length (measuring from the top of the shoulder down to the bottom edge) to be roughly 9 inches. For a 3-6 month size, aim for about 10.5 inches. Because babies have varying torso lengths and grow incredibly fast, do not stress if it is slightly longer—a slightly oversized, cozy fit is both trendy and highly practical for layering!
Text to hyperlink: For clean yarn cuts that prevent fraying, especially when finishing your body panels, we highly recommend a pair of Sharp Precision Crafting Scissors from Amazon. A good pair of precision scissors is a lifetime investment for any crochet enthusiast.
👉 Click the link to check the price on Amazon
Step 4: Crocheting the Sleeves (The No-Sew Method)
Many beginners absolutely dread making sleeves because it usually involves complex shaping and tedious seaming. However, because we are working directly into the armholes we created in Step 2, there is zero seaming involved!
Round 1: Attach your yarn to the center stitch of the underarm (the middle chain of the Chain-3 space). Chain 2. Place 1 Dc in the exact same space, and continue placing 1 Dc evenly around the entire armhole opening. When you get back to the start of the round, slip stitch (Sl St) into the top of the first Dc to join.
Rounds 2 – 12 (Or desired sleeve length): Chain 2. Place 1 Dc in each stitch around. Join with a Sl St at the end of each round.
To give the sleeve a gentle taper toward the baby’s wrist, you can optionally do a decrease round (crocheting two stitches together, known as Dc2Tog) for the final two rounds. Once the sleeve reaches the baby’s wrist length, fasten off and weave in the end. Repeat this exact exact process for the second sleeve.
Step 5: Adding the Ribbed Border and Buttonholes
A ribbed border gives your handmade cardigan a highly polished, store-bought finish and prevents the front edges from curling outward over time. We will be using alternating Front Post Double Crochet (FPdc) and Back Post Double Crochet (BPdc) to create this stretchy, beautiful texture.
The Bottom Hem:
Attach your yarn at the bottom front corner of the cardigan. Chain 2, and crochet one row of alternating FPdc and BPdc straight across the bottom edge. Fasten off.
The Neckline & Buttonhole Band:
Attach your yarn at the bottom right corner (the front right panel).
Row 1: Single crochet (Sc) evenly up the right side, around the entire neckline, and down the left side.
Row 2 (Buttonhole Row): Turn your work. Sc up the left side. When you reach the right side (where the buttons will eventually go), you need to create the buttonholes. To do this: Sc 4, Chain 2, skip 2 stitches, Sc 6. Repeat this sequence to create 3 or 4 evenly spaced buttonholes, depending entirely on the total length of your cardigan.
Row 3: Turn, Sc back around the entire border, making sure to place 2 Sc into each Chain-2 buttonhole space. Fasten off and cut your yarn.
Text to hyperlink: Finishing your cardigan requires securely weaving in your yarn tails so the garment survives the washing machine. Grab this Essential Tapestry Needle Set on Amazon—the blunt tips slide smoothly through yarn without splitting the delicate fibers.
👉 Click the link to check the price on Amazon
Step 6: Finishing Touches and Care Instructions
You are almost done! Take your tapestry needle and carefully weave in all loose yarn ends on the inside of the cardigan to ensure they are invisible. Next, line up your wooden buttons on the left panel directly opposite the buttonholes you created on the right panel. Use a piece of matching yarn to securely sew the buttons into place. Make sure they are fastened very tightly to avoid any potential choking hazards for the baby.
Caring for the Cardigan:
Handmade items require a little extra love. We highly recommend washing this cardigan inside out on a gentle, cold water cycle. Lay it completely flat on a dry towel to air dry. Never hang a wet crochet sweater on a hanger, as the sheer weight of the wet yarn can stretch out those beautiful, even stitches you worked so hard on!

Conclusion
Congratulations on completing your very own Charming Crochet Baby Cardigan! By utilizing the top-down raglan construction method, you have successfully bypassed the tedious sewing and panel shaping that often discourages many beginners, resulting in a beautiful, seamless, professional-looking garment. Whether you are gifting this to an expecting friend, a grandchild, or keeping it for your own baby’s winter wardrobe, this handmade sweater is sure to become a cherished family keepsake.
Do not forget to pin this free pattern to your Pinterest crochet boards so you can easily find it again for your next baby shower gift. Happy crafting!
I hope this article has provided you with all the information you were looking for on this topic. Thank you for taking the time to read this article, and I hope you found it useful and informative.
Hola buenas tardes. Me gustaría conseguir el tutorial para hacer este precioso jersey de bebé. Estoy suscrita a tu página web pero no sé encontrar este modelo. ¿Me puedes ayudar ?
Muchas gracias y un saludo
How to Crochet a Seamless Baby Cardigan: Top-Down Raglan Tutorial
Hola! Muchas gracias por tu interés. Tenemos una guía completa en formato PDF por solo $5 donde explicamos paso a paso cómo tejer este modelo. Si estás interesada, avísame y te compartiré el enlace para conseguirlo. ¡Un saludo!