Disclosure: This post contains affiliate links. As an Amazon Associate, we earn a small commission from qualifying purchases at no extra cost to you. We only recommend products we truly love and trust.
As someone who is deeply passionate about the world of babies, especially newborns, I am always dedicated to providing mothers and fathers with valuable, practical, and helpful guidance to support you on your parenting journey.
Crocheting for a new baby is one of the most rewarding and heartwarming craft projects you can ever undertake. Whether you are an expecting parent, a proud grandparent, or a thoughtful friend looking to create a personalized baby shower gift, handmade baby items carry an emotional warmth that store-bought garments simply cannot replicate.
If you are a complete beginner, the world of crochet might feel a bit overwhelming at first glance. With thousands of hook sizes, yarn weights, and endless accessories available, it is easy to wonder: What tools do I actually need to start making safe, soft, and adorable baby items?
The great news is that crocheting for infants is surprisingly simple, fast, and beginner-friendly. Because baby garments and blankets are small, they require less time and fewer materials than adult projects. With just 10 essential, beginner-friendly tools, you can easily master the basics and start crafting heirloom-quality baby items today.

- Why Crochet Baby Items is the Ultimate Beginner Project
Starting your crochet journey with baby items is a strategic and enjoyable choice for several practical reasons:
Fast Completion Rate: Small projects like baby booties or hats can be finished in just a few hours. This quick turnaround gives beginners an instant sense of achievement and builds confidence rapidly.
Low Material Cost: Baby items require significantly less yarn than adult sweaters or blankets, allowing you to practice high-quality stitches without spending a fortune on materials.
Forgiving and Flexible: Baby garments use soft, stretchy stitches that allow room for growth, making tiny size variations less noticeable.
High Emotional Value: Handmade gifts hold deep sentiment. Parents treasure hand-crocheted items for years, often keeping them as beloved family keepsakes. - Choosing the Right Yarn and Essential Beginner Tools
Before diving into patterns and stitches, having the right toolkit is vital. Baby skin is exceptionally delicate, so choosing gentle materials and ergonomic accessories ensures a smooth, enjoyable crafting experience.
Essential Yarn and Tool Considerations
When crafting for newborns and toddlers, keep these three safety and comfort rules in mind: - Hypoallergenic Softness: Always choose yarns certified safe for sensitive skin (such as super-soft acrylic, organic cotton, or bamboo blends).
- Machine Washable: Busy parents need practical items. Ensure your chosen yarn can handle regular machine washing.
- Ergonomic Comfort: Using comfortable, soft-grip hooks reduces hand fatigue and makes learning stitches effortless.
To help you build the perfect setup from day one, here are the core tools recommended for every beginner:
Tool #1: Soft, Certified Baby Yarn: The foundation of every project. Look for Light Worsted (DK) or Sport weight yarn for tiny garments. For a budget-friendly and silky-smooth option, we highly recommend checking out Premium Soft Baby Yarn on Amazon for breathable, machine-washable comfort.
Tool #2: Ergonomic Crochet Hooks: Ergonomic hooks featuring rubberized, soft-grip handles prevent hand cramps during long crafting sessions. Beginners should start with sizes 4.0mm (G/6) to 5.0mm (H/8). Take a look at this Ergonomic Crochet Hook Set on Amazon which includes all standard sizes along with a travel case.
Tool #3: Locking Stitch Markers: Essential for marking the start of rounds in baby hats or keeping track of stitch counts in baby blankets.
Tool #4: Measuring Tape: Precise measurements are key to making sure booties and cardigans fit growing infants perfectly.
Tool #5: Blunt Yarn Needles: Needed for weaving in yarn tails smoothly without splitting delicate threads. - Standard Baby Sizing Chart (Newborn to 12 Months)
Accurate sizing is crucial when crocheting baby items. The table below provides standardized industry measurements for the four most popular baby projects to ensure your creations fit comfortably.
| Baby Age / Project | Hat Circumference (Inches) | Bootie Sole Length (Inches) | Chest Circumference (Inches) | Blanket Size (Inches) |
| Preemie | 10″ – 11″ | 2.75″ – 3.0″ | 12″ – 13″ | 18″ x 24″ (Lovey) |
| Newborn (0–3M) | 12″ – 14″ | 3.25″ – 3.5″ | 14″ – 15″ | 30″ x 30″ (Swaddle) |
| 3–6 Months | 14″ – 16″ | 3.75″ – 4.0″ | 16″ – 17″ | 30″ x 36″ (Stroller) |
| 6–12 Months | 16″ – 18″ | 4.25″ – 4.5″ | 18″ – 19″ |
Step-by-Step Beginner Pattern Guide: The Classic Baby Beanie
Now that you have your tools and measurements ready, let’s look at the basic steps for crocheting a simple, adorable newborn beanie using basic stitches.

Step 1: Creating the Magic Ring and First Round
Start by forming a Magic Ring (or chain 4 and join with a slip stitch).
Chain 2 (acts as your turning chain), then work 10 Double Crochets (DC) into the center of the ring.
Pull the tail tight to close the center hole completely so tiny fingers cannot get caught. Join with a slip stitch.
Step 2: Increasing for the Crown
Round 2: Chain 2, work 2 DC into every stitch around (Total: 20 stitches).
Round 3: Chain 2, 1 DC in next stitch, 2 DC in following stitch, repeat from * around (Total: 30 stitches).
Continue increasing evenly until your flat circle matches the crown diameter listed in the sizing chart above.
Step 3: Working the Sides and Finishing
Once the crown width is reached, work 1 DC in each stitch around without increasing.
Continue working rounds until the hat reaches the desired height (approx. 5.5 inches for 0–3M).
Fasten off your yarn, cut a 6-inch tail, and weave it in securely using a blunt yarn needle.
Embellishments, Safety, and Professional Finishing Touches
Adding the final decorative details to your handmade baby items is often the most exciting stage of the craft. It is the moment where a simple collection of stitches transforms into a charming, personalized garment. However, when you are crafting items designed specifically for newborns, infants, and toddlers, safety must always be your primary and uncompromising consideration.
Crucial Safety Guidelines for Baby Crafting
Before applying any decorative elements to baby blankets, booties, or cardigans, keep these fundamental safety principles in mind:
Eliminate Small Choking Hazards: Traditional hard plastic safety eyes, small craft beads, and loose sequins can easily become detached over time and pose a severe choking hazard to curious infants. Instead of hard plastic elements, always choose embroidered features created directly with soft yarn or embroidery floss.
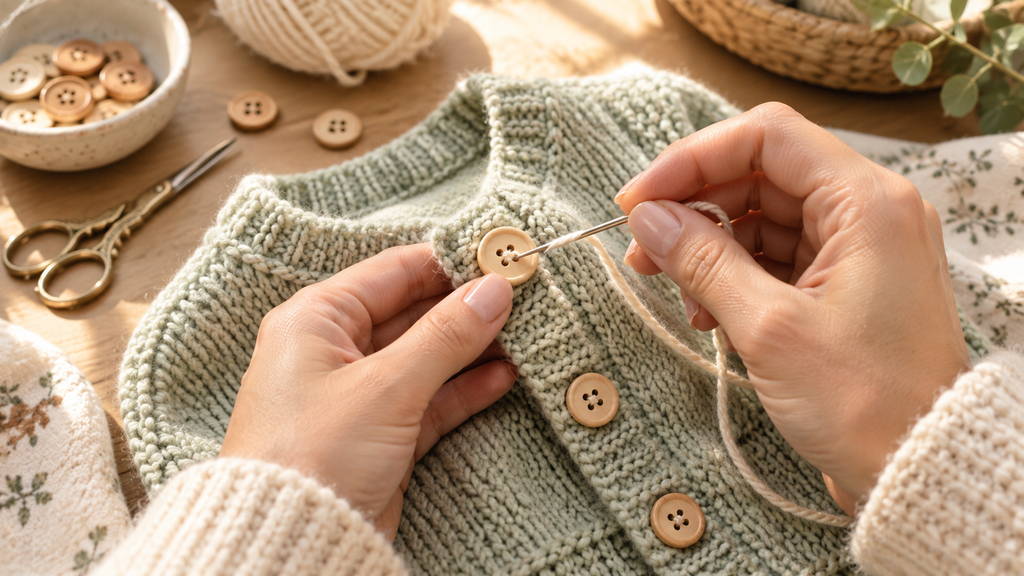
Double-Stitch All Functional Accessories: Buttons on cardigans, straps on booties, or decorative bows must be sewn down with extreme security. Use high-tensile craft thread or the remaining yarn tail to stitch through the attachment points multiple times, anchoring them firmly on the interior of the fabric.
Select Gentle, Natural Fasteners: When selecting buttons or closures, choose lightweight, ultra-smooth materials such as natural wood or soft food-grade silicone. Avoid metals that might irritate sensitive skin or cheap plastics with sharp seam edges.
Recommended Finishing Tools for Your Arsenal
Tool #6: Natural Smooth Wooden Buttons: Wooden buttons add a timeless, rustic, and artisan quality to baby cardigans, booties, and bonnet straps. They provide a high-end boutique finish while remaining comfortable against an infant’s skin. To complete your garments safely, check out these Natural Wooden Baby Craft Buttons on Amazon which feature smooth, rounded edges and dual sewing holes for extra-secure attachment.
Tool #7: Soft Pom-Pom Makers: Adding a plush pom-pom to the top of a baby beanie instantly elevates the design. Using a dedicated pom-pom maker ensures that every yarn strand is tied tightly in the center, preventing loose threads from pulling out when washed.
Tool #8: Custom Fabric Care Labels: Adding a soft woven or printed “Handmade with Love” label inside the neckband of a sweater or along the border of a blanket gives your handmade creation a refined, store-quality presentation that parents will cherish.
Pro-Tips, Troubleshooting, and Fixing Common Beginner Mistakes
Even the most passionate crafters run into occasional roadblocks, especially when learning how to regulate tension and measure tiny garments. Understanding how to diagnose and correct these common beginner errors early will save you hours of frustration and unraveling.
Problem 1: My Finished Item is Too Stiff, Rigid, or Too Loose
The Underlying Cause: This issue stems from incorrect tension (gauge) or choosing a hook size that does not complement your yarn weight. If your hook is too small for the yarn, the stitches will be densely packed, creating a stiff fabric that feels uncomfortably rigid for a baby. Conversely, a hook that is too large creates loose, gappy stitches that can catch tiny fingers.
The Expert Solution: Never skip creating a 4×4 inch gauge swatch before starting a garment pattern. Work your chosen stitches for a few inches and measure how many stitches and rows fit within a four-inch square. If your swatch turns out too dense, switch to a hook size that is 0.5mm larger. If your stitches are too loose, step down by 0.5mm.
Problem 2: The Edges of My Baby Blanket or Sweater Are Crooked and Uneven
The Underlying Cause: Accidentally dropping the very first or last stitch of a row, or inadvertently adding extra stitches into the turning chain, is the single most common mistake made by beginner crocheters.
The Expert Solution: Incorporate Locking Stitch Markers into your daily workflow. Place a marker into the first stitch and the final stitch of every single row as soon as you complete them. When you reach the end of a row, count your stitches meticulously to ensure your total stitch count matches your pattern instructions exactly.
Problem 3: Seams and Yarn Tails Are Unraveling After Machine Washing
The Underlying Cause: Cutting yarn tails too short or simply tying a knot and clipping the thread close to the fabric will inevitably lead to unraveling after a few wash cycles.
The Expert Solution: Always leave a generous 6 to 8-inch yarn tail whenever you join a new yarn skein or fasten off your work. Using a blunt, large-eye yarn needle, weave the tail back and forth through the thickest part of your stitches in three distinct directions: horizontally to the right, back to the left, and vertically through the stitch posts. This technique locks the fibers securely in place.
Comprehensive Care, Washing, and Storage Guidelines
Handmade baby garments and heirloom blankets deserve proper care to maintain their original shape, softness, and vibrant color through countless daily uses and laundry cycles.
Safe Laundry Practices for Handmade Items
Temperature and Cycle Settings: Always place delicate baby crochet items inside a fine-mesh laundry bag before putting them in the washing machine. This prevents sleeves and blanket tassels from snagging on the agitator or other clothing items. Select a gentle or delicate wash cycle using cool water.
Detergent Selection: Baby skin is highly sensitive to artificial dyes, harsh chemical brighteners, and heavy synthetic perfumes. Always use mild, hypoallergenic, baby-safe detergents or gentle wool washes.
Drying Methods: High heat from standard tumble dryers can melt synthetic acrylic fibers, cause organic cotton to shrink, or felt natural wool fibers. Gently press excess water out of the garment by rolling it inside a dry, clean white towel. Never wring or twist the fabric. Lay the item completely flat on a drying rack away from direct sunlight.
Blocking Your Finished Crochet Work
Blocking is the secret step that separates amateur projects from professional handmade garments. By dampening your completed crochet pieces and pinning them to exact measurements on foam mats, you relax the stitches, smooth out minor tension imperfections, and square off uneven edges.
Tool #9: Interlocking Blocking Mats and Stainless Steel T-Pins: Essential for shaping baby blanket squares, blocking cardigan panels before assembly, and setting the final dimensions of baby booties.
Complete 10-Tool Checklist for Every Beginner Crafter
Before embarking on your next baby crochet creation, review this comprehensive toolkit checklist to ensure your craft space is fully equipped for success:
- Certified Baby-Safe Soft Yarn: Light worsted or DK weight yarn in gentle pastel or modern neutral shades.
- Ergonomic Soft-Grip Hook Set: Sizes 3.5mm through 5.0mm featuring cushioned rubber handles.
- Locking Plastic Stitch Markers: Brightly colored markers to track row counts and edge stitches.
- Flexible Fiber Measuring Tape: Soft vinyl measuring tape for taking precise body and head measurements.
- Blunt Large-Eye Yarn Needles: Steel or aluminum tapestry needles for weaving in tails effortlessly.
- Smooth Natural Wooden Buttons: Eco-friendly 15mm–20mm buttons for cardigans and bootie closures.
- Precision Craft Scissors: Sharp, compact scissors dedicated exclusively to cutting yarn cleanly.
- Interlocking Blocking Mats: High-density foam mats with grid markings for precise garment shaping.
- Stainless Steel T-Pins: Rust-proof pins designed to hold damp crochet pieces securely while blocking.
- Soft Woven Care Labels: Professional fabric tags to give your handmade gifts a polished finish.

Conclusion: Start Your Baby Crochet Journey with Confidence Today
Crocheting handmade items for babies is far more than just a creative hobby—it is a heartfelt journey that connects love, warmth, and craftsmanship into every stitch. As a beginner, embarking on this path might initially feel intimidating, but as we have explored throughout this ultimate guide, success comes down to having the right foundation. By mastering the core fundamentals—from understanding soft yarn types and accurate age-based sizing charts to utilizing safety-first finishing techniques—you are fully equipped to craft beautiful, long-lasting baby items that parents will treasure forever.
A Quick Recap of Your Baby Crochet Blueprint:
The Essential Toolkit: Investing in certified baby-safe yarns, soft-grip ergonomic hooks, and locking stitch markers guarantees a comfortable, strain-free crafting experience while preventing common tension and sizing mistakes.
Precision and Safety First: Utilizing standard sizing charts for hats, booties, sweaters, and blankets removes the guesswork, while securing wooden buttons and weaving yarn tails properly ensures your items remain safe and machine-washable.
Professional Care and Finishing: Gentle laundry practices, proper blocking technique, and adding personalized fabric tags instantly elevate your projects from homemade crafts to luxury boutique-quality heirlooms.
Take Your First Stitch Today!
Now that you have the complete roadmap and insider tips at your fingertips, there is no better time to begin. Choose your very first project—whether it is a cozy newborn beanie, a pair of stay-on booties, or a soft crib blanket—grab your ergonomic hook, and let your creativity bloom.
What baby project are you excited to create first? Bookmark this master guide for quick reference during your crafting sessions, share it with your fellow crochet enthusiasts on Pinterest, and drop your thoughts or questions in the comments below. Happy crocheting!
Looking for the perfect fit? Check out our complete guide on Baby Crochet Size Charts: How to Measure Hats, Booties, Sweaters & Blankets to ensure all your creations fit comfortably from Newborn to 12 months!
Passionate about newborn care, I am dedicated to sharing valuable tips, guides, and insights to support parents every step of the way.