Disclosure: This post contains affiliate links. As an Amazon Associate, we earn a small commission from qualifying purchases at no extra cost to you. We only recommend products we truly love and trust.
As someone who is passionate about babies and young children, in this article I will show you how to make a safe and gentle baby rattle that is perfect for your little one or as a thoughtful handmade gift for another baby.
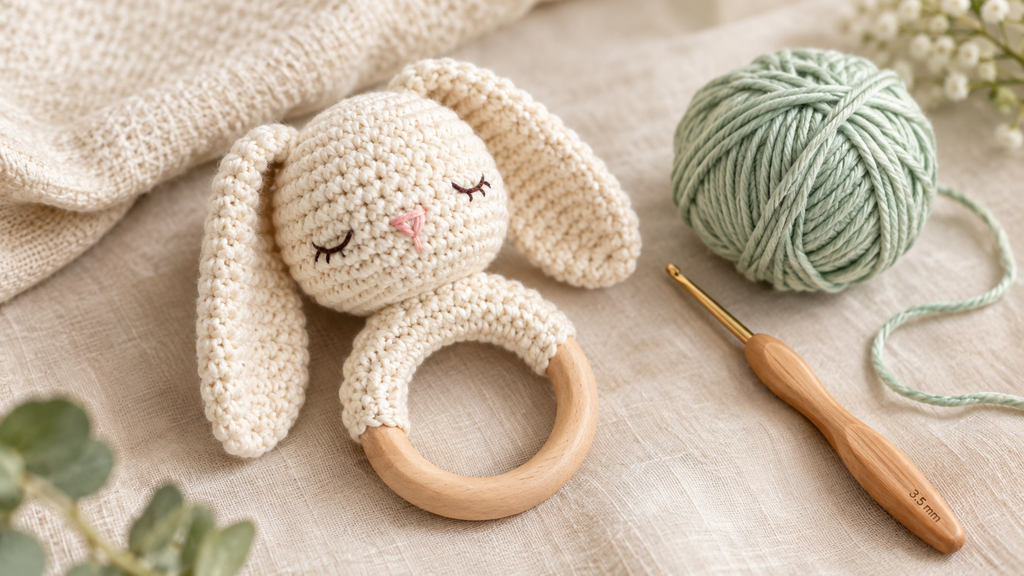
There is something truly magical about holding a handmade baby toy in your hands. Whether you are an expectant parent creating a nursery keepsake, a grandmother crafting a heartfelt gift, or a beginner looking for a rewarding weekend project, making a crochet bunny rattle is one of the most delightful baby craft journeys you can embark on.
Babies explore the world through touch, sound, and curiosity. A soft, beautifully textured amigurumi bunny rattle provides sensory stimulation, supports early fine motor skills, and offers endless comfort. But as a beginner, tackling a baby toy can feel intimidating. Will it be too hard to shape? Is the yarn safe for sensitive skin? How do you keep the rattle box securely inside?
Don’t worry! This comprehensive guide walks you through every single step with zero jargon, complete safety checklists, and beginner-friendly instructions. By the end of this guide, you will confidently craft a charming, boutique-quality crochet bunny rattle that is as safe as it is adorable.
- Why the Crochet Bunny Rattle is the Ultimate Beginner Project
If you are new to the world of amigurumi (crocheted stuffed toys), starting with a small baby rattle is far better than plunging into complex, large-scale projects. Here is why this pattern is the absolute best starting point:
Quick Gratification: Unlike large baby blankets that take weeks to finish, a bunny rattle can easily be completed in a single afternoon or weekend.
Low Material Investment: You only need small amounts of yarn (often called “yarn scraps”), making it a budget-friendly project to test your skills.
Mastering Core Techniques: This pattern teaches you the foundational blocks of all crochet toys—the magic ring, single crochet increases, invisible decreases, and simple assembly.
High Emotional Value: Handmade baby gifts are treasured heirlooms. Parents deeply appreciate the warmth, effort, and personalized love woven into every stitch.
Beginner Tip: Don’t worry if your first few stitches look a bit tight or loose! Amigurumi is extremely forgiving, and small variations only add unique handmade charm to your bunny’s personality.
- Materials & Tools: Selecting Safe, Baby-Friendly Supplies
When crafting toys for newborns and infants, safety and soft texture are your top priorities. Babies naturally chew, hug, and shake their toys, so selecting certified materials is essential.

Essential Materials Checklist:
- Certified Baby Yarn (100% Cotton or Soft Acrylic):
Newborn skin is sensitive and prone to irritation. Always opt for hypoallergenic, breathable yarn that does not shed tiny fibers (which could become choking hazards).
🛒 Recommended Pick: For the softest finish that holds shape after washing, choose Certified Soft Cotton Baby Yarn on Amazon. - Ergonomic Crochet Hook (Size 2.5mm – 3.5mm):
To keep the polyester stuffing securely hidden inside, amigurumi requires tight stitches. Using a hook slightly smaller than the yarn label suggests prevents holes, while an ergonomic rubber grip prevents hand fatigue during tight stitching.
🛒 Recommended Pick: Enjoy smooth, strain-free crafting with an Ergonomic Soft-Grip Crochet Hook Set on Amazon. - Natural Wooden Teether Ring or Soft Base:
A smooth, untreated wooden ring provides a natural teething surface for baby gums while making the rattle easy for tiny hands to grasp.
🛒 Recommended Pick: Ensure total safety with non-toxic, untreated Natural Smooth Wooden Baby Rings on Amazon. - Safety Rattle Inserts: High-pitch, gentle noise plastic noise maker rattle balls (approx. 20mm–24mm).
- Hypoallergenic Fiberfill Stuffing: Premium polyester fiberfill that remains soft and washable.
- Blunt Yarn Needle & Stitch Markers: Essential for smooth assembly and keeping track of your rounds.
- Bunny Rattle Sizing & Dimensions Reference Chart
Having clear dimensions ensures your finished rattle is lightweight enough for a baby to lift and small enough to avoid any awkward strain on tiny hands. Below is the standard size guide for this pattern:
| Component | Standard Measurement | Baby Age Suitability | Key Purpose |
| Wooden Ring Diameter | 68mm – 70mm (2.7 – 2.8 in) | 0 – 12 Months | Easy grip & soothing teether ring |
| Bunny Head Width | 6cm – 7cm (2.3 – 2.7 in) | 0 – 12 Months | Houses the safety rattle box securely |
| Floppy Ear Length | 8cm – 10cm (3.1 – 3.9 in) | 3 – 12 Months | Tactile stimulation for baby’s fingers |
| Overall Toy Height | 14cm – 16cm (5.5 – 6.3 in) | 0 – 12 Months | Perfect lightweight size for rattling |
- Step-by-Step Bunny Rattle Crochet Pattern (The Head & Base)
Before starting, familiarize yourself with standard US crochet abbreviations:
sc: Single Crochet
inc: Increase (2 sc in the same stitch)
dec: Invisible Decrease (sc 2 stitches together using front loops only)
mr: Magic Ring
st(s): Stitch(es)
Phase A: The Ring Cover (Attaching to the Wooden Base)
This strip wraps around your wooden ring to serve as the sturdy foundation for the bunny head.
Row 1: Chain 9. Starting in the 2nd chain from the hook, sc in each st across. Turn. (8 sts)
Rows 2 to 16: Ch 1, sc in each st across. Turn. (8 sts)
Fasten off, leaving a long tail (approx. 20cm) for sewing around the ring later.
Phase B: The Bunny Head (With Rattle Placement)
Worked in continuous spiral rounds. Do not join with a slip stitch at the end of rounds; use a stitch marker to track the first stitch of each round.
Round 1: Work 6 sc into a Magic Ring. (6 sts)
Round 2: Inc in every st around. (12 sts)
Round 3: [1 sc, inc] × 6 times. (18 sts)
Round 4: [2 sc, inc] × 6 times. (24 sts)
Round 5: [3 sc, inc] × 6 times. (30 sts)
Rounds 6 to 12: Sc in each st around (7 rounds total without increases). (30 sts)
Round 13: [3 sc, dec] × 6 times. (24 sts)
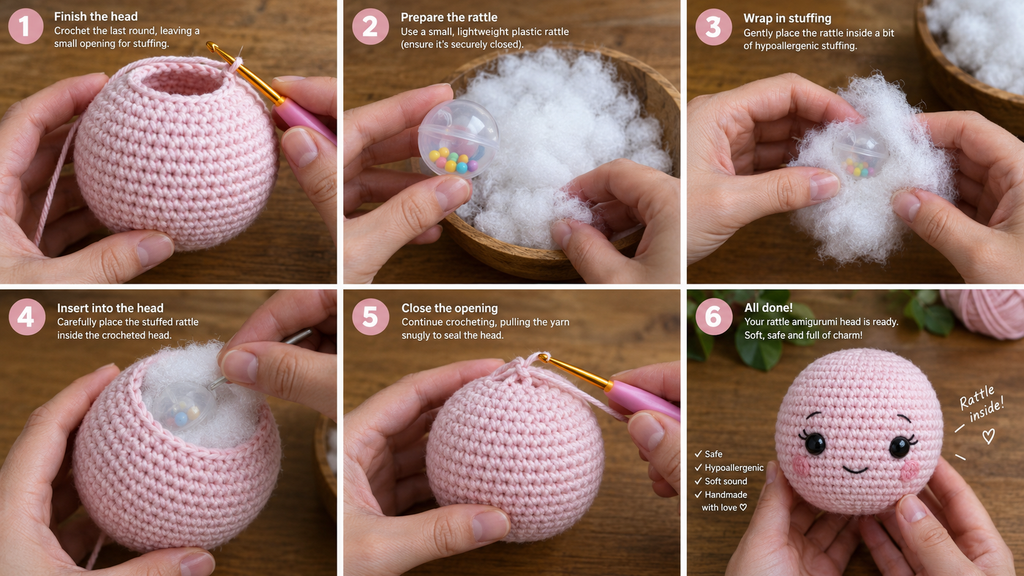
CRITICAL RATTLE & STUFFING STEP:
Add a firm layer of fiberfill stuffing to the bottom half of the head.
Wrap your plastic rattle insert in a small tuft of fiberfill (this prevents hard plastic edges from touching the yarn and muffles harsh sounds into a soothing rattle).
Place the wrapped rattle directly in the center of the head.
Fill remaining space firmly with stuffing around all sides.
Round 14: [2 sc, dec] × 6 times. (18 sts)
Round 15: [1 sc, dec] × 6 times. (12 sts)
Round 16: Dec in every st around. (6 sts)
Fasten off, weave long tail through front loops of remaining 6 stitches, pull tight to close, and hide thread inside.
- Step-by-Step Bunny Rattle Crochet Pattern (Ears, Assembly & Embroidery)
Now that you have completed the sturdy wooden base ring cover and the perfectly stuffed rattle head, it is time to craft the signature feature of your toy: the long, floppy bunny ears. In amigurumi, facial features and secure assembly dictate whether a handmade toy looks amateur or boutique-quality. Follow these steps meticulously.
Phase C: The Long Floppy Bunny Ears (Make 2)
Worked in continuous spiral rounds using your main yarn color.
Round 1: Work 6 sc into a Magic Ring. (6 sts)
Round 2: [1 sc, inc] × 3 times. (9 sts)
Round 3: [2 sc, inc] × 3 times. (12 sts)
Rounds 4 to 10: Sc in each st around (7 rounds total). (12 sts)
Round 11: [2 sc, dec] × 3 times. (9 sts)
Rounds 12 to 14: Sc in each st around (3 rounds total). (9 sts)
Fasten off, leaving a long tail (approx. 30cm) for sewing the ears onto the head. Note: Do not stuff the ears; they are designed to remain flat, soft, and floppy for the baby to fold and chew safely. - Facial Embroidery & Secure Assembly: The Professional Touch
How you attach the parts determines the long-term safety of the toy. A loose ear or poorly tied knot can turn a lovely gift into a safety hazard.
Step 1: Embroidering Sleepy Eyes & Nose
Before attaching the ears or mounting the head to the wooden ring, embroider the face while you have easy access to the interior.
The Eyes: Use a blunt embroidery needle threaded with dark brown or black cotton yarn. Embroider small, closed sleeping eyes (curved arches with tiny upward eyelashes) centered between Rounds 8 and 10 of the bunny head, spaced about 4 to 5 stitches apart.
The Nose: Using a soft pastel pink yarn, stitch a small triangular or horizontal nose right between the eyes on Round 9.
Safety Knot Tip: Tie your securing knots firmly on the inside or the bottom base of the head where it will be completely hidden from view once assembled.
Step 2: Attaching the Ears
Flatten the open end of each ear closed.
Position the ears symmetrically on top of the head, roughly between Rounds 3 and 5, pointing slightly backward or downward to create a cute, relaxed look.
Using your yarn needle and the long tail, whipstitch securely across both thicknesses of the ear directly into the head stitches. Go back and forth at least twice to ensure the ears can withstand active pulling by a baby.
Step 3: Mounting the Head to the Wooden Ring
Wrap your previously crocheted ring cover strip tightly around the wooden ring, securing the long edge with a neat mattress stitch or whipstitch.
Align the bottom center opening of the stuffed bunny head over the top of the wrapped wooden ring.
Pin the head securely into place with blocking pins so it does not wobble.
Using the remaining strong yarn tail from the head, sew firmly through both the head base and the ring wrap, looping around the wooden ring structure multiple times. Pull tight after every two stitches to ensure the head remains rigidly fixed and upright, incapable of twisting loose. - Safety Tips, Care Guide & Troubleshooting Common Issues
Even the easiest craft projects can present small challenges. To ensure your handmade creation remains pristine, durable, and 100% safe for daily infant use, keep this expert troubleshooting checklist close by.
Critical Safety Rules for Baby Toys
No Buttons or Loose Beads: Never use plastic safety eyes with washers, buttons, or glued-on felt pieces for baby toys under 3 years old. Always use direct embroidery threads to eliminate choking hazards entirely.
Double-Check Your Tension: If you can see white polyester stuffing poking through your crochet stitches, your hook size is too large or your hand tension is too loose. Switch to a smaller hook size (e.g., drop from 3.0mm to 2.5mm) and pull your yarn loops slightly tighter.
Secure Ends: Weave all yarn tails at least 3 to 4 times in opposite directions inside the stuffed toy before trimming them flush. Never rely on a single knot.
Washing & Maintenance Instructions
Babies drool, spill milk, and drop toys on the floor constantly. Your crochet bunny rattle needs to be washable without losing its shape or sound.
Hand Wash Recommended: Fill a basin with lukewarm water and a few drops of mild baby shampoo or gentle eco-friendly detergent.
Gentle Squeeze: Submerge the rattle and gently squeeze soapy water through the cotton stitches. Do not twist, wring out aggressively, or place the plastic rattle box under harsh chemical bleaches.
Drying Flat: Rinse thoroughly with clean cold water, press out excess moisture using a dry cotton towel, and reshape the bunny head and ears with your hands. Lay flat on a drying rack away from direct scorching sunlight to protect the natural wooden ring and keep the cotton fibers vibrant.

- Conclusion: Crafting More Than Just a Toy—A Treasured Handmade Heirloom
Making a handmade baby toy is a deeply rewarding experience that blends creativity, care, and practical craftsmanship. Throughout this comprehensive guide, we have explored every essential step needed to bring your crochet bunny rattle to life with boutique-quality results:
Starting with Confidence: Understanding why a small amigurumi project serves as the ideal beginner milestone, offering quick gratification and foundational skill-building.
Prioritizing Safety: Selecting certified 100% organic cotton baby yarns, ergonomic hooks, and smooth, untreated wooden teether rings to ensure total safety for delicate infant skin.
Mastering the Structure: Following our standardized sizing charts and step-by-step instructions for the ring base, the stuffed rattle head, and the charming floppy ears.
Refining the Details: Executing secure facial embroideries with closed sleepy eyes and sturdy assembly techniques that eliminate safety hazards.
Ensuring Longevity: Applying proper maintenance, gentle hand-washing routines, and expert troubleshooting tips to keep the toy pristine and durable for everyday use.
Whether you are crafting this adorable bunny rattle as a thoughtful baby shower surprise, a cozy nursery keepsake, or a best-selling item for your handmade boutique, every single stitch carries a unique touch of warmth and love.
Ready to expand your handmade collection? Don’t forget to check out our complete guide on Baby Crochet Size Charts: How to Measure Hats, Booties, Sweaters & Blankets to ensure all your upcoming baby projects fit perfectly from newborn to 12 months! Grab your hooks, pick your favorite pastel yarn, and start creating your next heartfelt masterpiece today!
I hope this article has answered all of your questions and provided you with useful information about this topic. I truly hope you found it helpful and informative. Thank you so much for taking the time to read this article!