Disclosure: This post contains affiliate links. As an Amazon Associate, we earn a small commission from qualifying purchases at no extra cost to you. We only recommend products we truly love and trust.
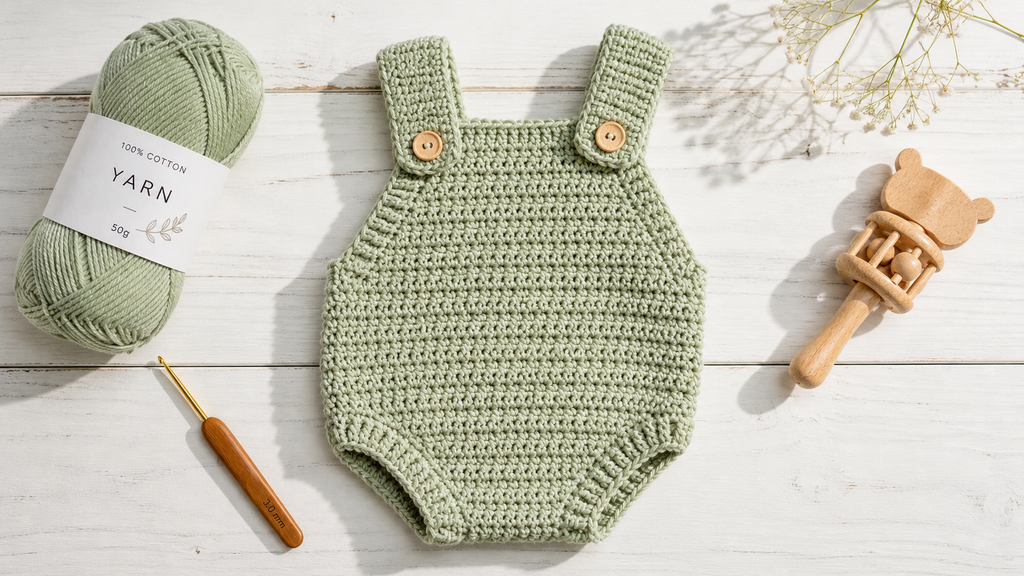
If you share my deep passion for crafting adorable baby crochet garments, you are in the right place! In this article, I will walk you through a complete, beginner-friendly tutorial to create a charming and cozy baby romper.
Welcome to the comforting world of baby crochet! If you have been searching for a rewarding, heartwarming crafting project that combines style, functionality, and pure cuteness, learning how to crochet a baby romper or onesie is the ultimate choice. There is something truly magical about transforming a simple skein of soft yarn into a charming, handmade garment that keeps a little one snug and stylish.
Handmade baby rompers and onesies have become an absolute favorite among modern crafting parents, grandmothers, and gift-makers. Unlike standard store-bought infant clothing, a handcrafted crochet onesie offers unmatched softness, unique personal detail, and a rustic aesthetic that looks stunning in milestone baby photographs. Whether you are preparing a heartfelt baby shower gift or building a cozy, breathable wardrobe for your own infant, this comprehensive guide will walk you through every single stitch with total confidence.
Many beginners feel intimidated by the thought of crocheting an entire baby garment, assuming it requires complex shaping, advanced tailoring, or tricky sewing techniques. However, this free pattern is specifically designed with novices in mind! By breaking down the construction into simple, manageable steps—using basic foundational stitches—you will quickly realize that making a classic baby romper is far easier than it looks.
In this complete tutorial, we provide a standardized sizing chart covering ages from Preemie up to 24 Months, clear stitch-by-step instructions, essential yarn recommendations for sensitive baby skin, and practical customization ideas. Grab your favorite soft cotton yarn and crochet hook, and let’s create a timeless heirloom piece together!
- Why a Crochet Baby Romper Is the Perfect Beginner Project
When starting your journey into crocheting baby clothes, selecting the right garment is crucial for building confidence without feeling overwhelmed. While large baby blankets can take weeks to finish and complex sweaters require tedious assembly, a crochet baby romper hits the sweet spot of speed, practicality, and skill development.
Here is why this project should be at the very top of your crafting bucket list:
Fast & Gratifying Completion: Baby rompers are compact and work up surprisingly fast! Because infants are small, you can easily complete a full onesie over a relaxed weekend or a few peaceful evenings. This instant gratification keeps your momentum high and makes crafting fun.
Minimal Assembly Required: One of the biggest hurdles for beginner crocheters is sewing multiple garment panels together. Our streamlined pattern uses seamless construction methods for the main body, reducing seaming to an absolute minimum so you can focus on enjoying the stitches.
High Practicality & Comfort: Rompers are an all-in-one wardrobe staple for infants. They provide full coverage over diapers, stay securely in place during tummy time, and won’t ride up like standard baby shirts often do.
Essential Skill Building: Making a romper introduces foundational garment techniques in simple bite-sized lessons. You will practice working in rounds, creating clean armholes, shaping a comfortable crotch panel, and adding simple buttonholes—skills that lay the ground for all future clothing projects!
Budget-Friendly Crafting: Because baby clothing requires very little yardage, you can craft a premium, high-quality infant outfit using just one or two skeins of high-grade yarn. It is an affordable way to create luxury-level handmade fashion. - Choosing the Right Materials: Yarn & Tools for Sensitive Baby Skin
Creating garments for newborn infants and active toddlers demands extra consideration when choosing your materials. Babies have incredibly delicate skin that reacts easily to rough textures, synthetic dyes, or stiff fibers. Therefore, prioritizing ultra-softness, breathability, and washability is key to crafting a romper your baby will love wearing.
Recommended Yarn Weights & Fibers
For a lightweight, flexible, and non-irritating fit, a Category 3 (DK / Light Worsted) yarn is the absolute gold standard. DK weight yarn provides enough warmth while remaining light enough to prevent overheating during spring and summer play.
100% Natural Cotton Blends: Cotton is hypoallergenic, highly breathable, and remarkably durable. It feels cool against delicate skin and absorbs moisture, making it ideal for summer onesies.
Soft Premium Acrylics: High-quality, Oeko-Tex certified acrylics offer cloud-like softness, great elasticity, and incredible durability through dozens of washing machine cycles.
🛒 Amazon Affiliate Link Placement:
Give your baby onesie the softest feel possible by using Insert Amazon Affiliate Link: Ultra-Soft DK Cotton Baby Yarn. It is tested for harmful substances, hypoallergenic, and comes in gorgeous pastel shades perfect for classic infant wear!
Essential Crochet Tools & Accessories
Having the proper tools on hand makes your stitching experience smooth and enjoyable. Here is your quick preparation checklist before starting: - Ergonomic Crochet Hook (3.5 mm to 4.0 mm / US E-4 to G-6): Using an ergonomic soft-grip hook dramatically reduces hand fatigue and wrist strain, allowing you to stitch comfortably for hours.
🛒 Amazon Affiliate Link Placement:
Protect your hands during long crafting sessions with a comfortable Insert Amazon Affiliate Link: Ergonomic Soft Grip Crochet Hook Set, featuring smooth aluminum tips that glide effortlessly through cotton yarn. - Decorative Wooden Buttons (12 mm – 15 mm): Buttons are crucial for securing the shoulder straps and crotch snap panel, allowing for effortless diaper changes.
🛒 Amazon Affiliate Link Placement:
Add a rustic, aesthetic touch to your baby onesie with Insert Amazon Affiliate Link: Natural Smooth Wooden Decorative Buttons, perfectly smooth to ensure zero scratching against baby skin. - Essential Accessories:
Locking Stitch Markers: Essential for marking armhole splits and crotch shaping points accurately.
Yarn Needle (Tapestry Needle): For weaving in yarn tails neatly.
Soft Measuring Tape: To check your gauge and measure baby growth dimensions accurately. - Printable Baby Romper Sizing Chart
Achieving a comfortable, flexible fit relies on accurate measurements. Because babies grow rapidly, always measure your baby’s torso or consult this standardized sizing chart before starting your foundation chain.
Pro-Tip for Sizing: If you are crafting a baby shower gift and are unsure of the exact measurements, it is always best to size up! Babies grow quickly, and a slightly roomier romper allows space for bulky cloth diapers.
Standardized Infant & Toddler Measurement Table
| Age / Size Category | Target Chest Width | Torso Length (Shoulder to Crotch) | Thigh Opening Circumference | Recommended Hook Size |
| Preemie | 13.0″ – 14.0″ (33 – 35 cm) | 10.5″ – 11.5″ (26 – 29 cm) | 6.0″ – 7.0″ (15 – 18 cm) | 3.5 mm (E-4) |
| 0 – 3 Months | 15.0″ – 16.0″ (38 – 40 cm) | 12.5″ – 13.5″ (31 – 34 cm) | 7.5″ – 8.5″ (19 – 21 cm) | 3.75 mm (F-5) |
| 3 – 6 Months | 16.5″ – 17.5″ (42 – 44 cm) | 14.0″ – 15.0″ (35 – 38 cm) | 9.0″ – 10.0″ (22 – 25 cm) | 4.0 mm (G-6) |
| 6 – 12 Months | 18.0″ – 19.0″ (45 – 48 cm) | 15.5″ – 16.5″ (39 – 42 cm) | 10.5″ – 11.5″ (26 – 29 cm) | 4.0 mm (G-6) |
| 12 – 18 Months | 19.5″ – 20.5″ (49 – 52 cm) | 17.0″ – 18.0″ (43 – 45 cm) | 12.0″ – 12.5″ (30 – 32 cm) | 4.0 mm (G-6) |
| 18 – 24 Months | 21.0″ – 22.0″ (53 – 56 cm) | 18.5″ – 19.5″ (47 – 49 cm) | 13.0″ – 13.5″ (33 – 34 cm) | 4.5 mm (7) |

- Step-by-Step Crochet Baby Romper Pattern
Now that you have gathered your materials and checked your sizing requirements, it is time to start crafting! This pattern uses basic, versatile stitches—primarily Single Crochet (sc) for sturdy edging and Double Crochet (dc) for a soft, flexible drape.
Follow these four structured phases to construct your baby onesie from the bottom up.
Phase 1: Constructing the Back Crotch Panel
We begin at the bottom crotch flap, which provides a secure foundation for diaper coverage and functional button snaps.
Foundation Chain: Leaving a 6-inch yarn tail for weaving, create a slip knot and chain 13 (15, 17, 19, 21, 23) stitches according to your chosen size from the chart.
Row 1: Single crochet (sc) in the 2nd chain from your hook and in each chain across. Turn your work. (12, 14, 16, 18, 20, 22 stitches)
Rows 2 – 4: Chain 1 (does not count as a stitch throughout), sc in each stitch across. Turn.
Row 5 (Increasing Row): Chain 2 (counts as first double crochet), place 2 dc in the first stitch, dc in each stitch across until the final stitch, place 2 dc in the last stitch. Turn. (2 increased stitches)
Rows 6 – 10: Repeat Row 5 gradually expanding the panel width until you reach your target thigh circumference. Fasten off and set this back panel aside temporarily.
Phase 2: Constructing the Front Crotch Panel & Joining
Now, we create the matching front crotch flap and join both pieces to work the main body seamlessly in the round.
Front Panel: Reattach your yarn to your hook and repeat Rows 1 through 10 exactly as completed for the back panel.
Connecting for the Body: On the final row of your front panel, do not fasten off. Chain 6 (8, 10, 12, 14, 16) for the first side leg opening, join to the corner of the back panel with a slip stitch, dc across all back panel stitches, chain 6 (8, 10, 12, 14, 16) for the second leg opening, and slip stitch to the first stitch of the front panel.
Seamless Joining: You have now established a continuous circular foundation for the lower torso!
Phase 3: Working the Main Body & Chest Section
With the lower diaper area joined into a seamless loop, working up the torso is smooth, relaxing, and quick!
Round 1: Chain 2, place 1 double crochet (dc) in every stitch and chain around the entire perimeter. Join with a slip stitch to the top of your starting chain.
Rounds 2 – 18 (Torso Height): Chain 2, dc in each stitch around. Join with a slip stitch to the first stitch. Repeat this simple round continuously until the body measures 7″ (8″, 9″, 10″, 11″, 12″) from the crotch join up to the underarm area.
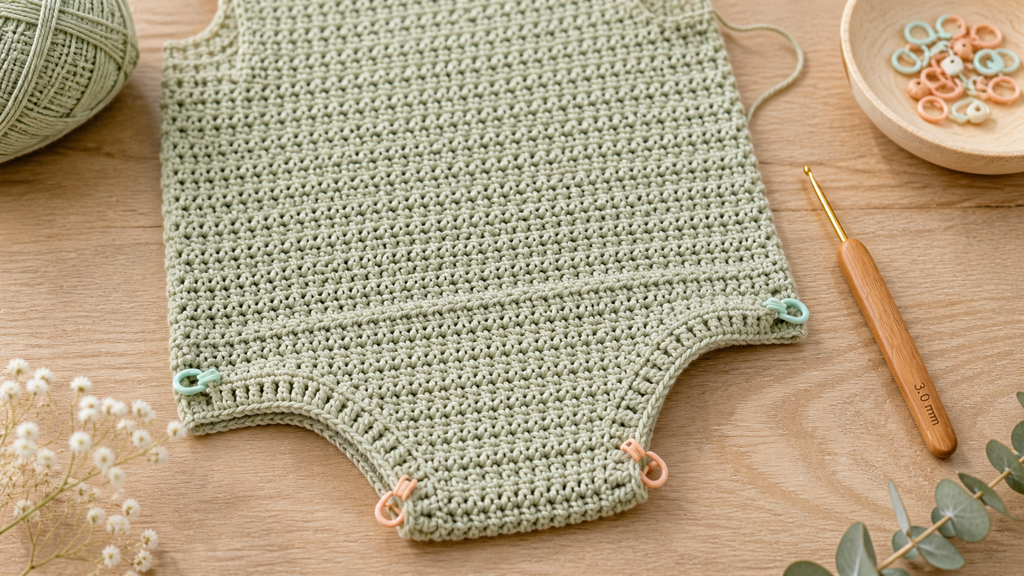
Splitting for Armholes: Place stitch markers on opposite sides of the chest to divide your total stitch count evenly into a Front Chest Panel and a Back Panel.
Phase 4: Shaping Front Bib, Back Bib, & Shoulder Straps
To finish the upper garment, we work back and forth in flat rows on each side to create a classic bib top.
Front Bib: Reattach yarn at the right underarm stitch marker. Chain 2, dc across the front chest stitches only. Turn. Continue working flat rows for 8 (10, 12, 14, 16, 18) rows, decreasing 1 stitch at each edge on alternating rows to create a gentle tapered bib shape. Fasten off.
Back Bib: Repeat the exact same row count for the back panel.
Crocheting Shoulder Straps: Reattach yarn to the top left corner of the back bib. Chain 3, dc across 4 stitches. Work flat rows until the strap reaches 5″ (6″, 7″, 8″, 9″, 10″) in length. On the final row, chain 2 (creating a natural buttonhole space), skip 1 stitch, and dc in the last stitch. Repeat for the top right shoulder strap.
Finishing Touches & Customization Ideas
The final touches transform a simple crocheted piece into an heirloom-quality designer garment.
Adding the Edging Trim: Attach contrasting or matching yarn around the armholes, thigh openings, and bib top. Work a single round of [1 sc, skip 1 st, 3 dc in next st, skip 1 st] to create a delicate shell stitch trim.
Attaching Buttons Securely: Sew your natural wooden buttons onto the top front bib corners using strong matching thread. Ensure buttons are fastened tightly so they remain completely safe for infants.
Crotch Snap Options: You can sew functional metal snap fasteners along the inside crotch overlap for fast, convenient diaper swaps on active babies.
Pro-Tips, Troubleshooting & Common Fixes
Even experienced crafters encounter small challenges when making fitted baby clothes. Here are quick solutions to common issues:
- “The Thigh Openings Are Too Tight or Stiff”
Cause: Working your foundational ch-joins or edging stitches with tight tension.
Fix: Switch to a hook half a size larger (e.g., 4.5 mm) when working around leg openings, or add 2 extra chain stitches during the Phase 2 side join. - “The Romper Is Stiff Instead of Drapey”
Cause: Using stiff 100% acrylic yarn or a hook that is too small for your yarn weight.
Fix: Always choose a flexible DK weight cotton blend and steam-block your finished pieces gently using low steam to relax the fibers. - “The Buttonholes Stretch Out Over Time”
Cause: Standard chain spaces loosening under tension.
Fix: Work a round of tight single crochets directly inside the buttonhole loop during your final edging pass to reinforce the opening structure.

Care & Maintenance: How to Keep Your Handmade Baby Romper Soft
Handmade garments are true treasures, and with the right care, your crocheted baby onesie can stay soft, stretch-free, and beautiful through countless wears. To preserve the shape and gentle texture of the yarn, always hand-wash your romper in cool water using a mild, baby-safe detergent. Never wring or twist the wet garment; instead, gently press out excess water and lay it flat on a dry towel to air dry. Hanging wet crochet can cause the shoulder straps to stretch out of shape.
If you want to complete this adorable outfit, you can easily pair this romper with a matching summer accessory! Be sure to check out our step-by-step guide on How to Crochet an Easy Baby Sun Hat with Wide Brim to craft the ultimate handmade baby gift set.
- Conclusion: Wrap Your Baby in Handmade Love
Crocheting a baby romper is more than just a crafting project—it is a heartfelt way to create a tender, cozy, and timeless piece that your little one will wear with comfort and style. From choosing ultra-soft, breathable yarns to putting the final touches on the button straps and leg openings, every stitch you craft adds a personal touch that store-bought clothing simply cannot replicate.
Whether you made this cute onesie as a practical addition to your baby’s daily summer wardrobe or as a memorable baby shower gift for a loved one, you have built a charming handmade piece to be proud of. As your baby grows, this soft cotton romper will stand as a beautiful keepsake of their earliest months.
Now it’s your turn to get started! Grab your favorite pastel yarn, pick your hook size, and enjoy every stitch of this relaxing project.
Join the Crafty Community!
Did you enjoy crafting this baby romper? We would love to see your finished creations! Leave a comment below with your favorite yarn colors, or share your thoughts and questions. Don’t forget to bookmark this guide or pin it on Pinterest so you can easily return to this pattern for your next handmade gift!Join the Crafty Community!
Did you enjoy crafting this baby romper? We would love to see your finished creations! Leave a comment below with your favorite yarn colors, or share your thoughts and questions. Don’t forget to bookmark this guide or pin it on Pinterest so you can easily return to this pattern for your next handmade gift!