Disclosure: This post contains affiliate links. As an Amazon Associate, we earn a small commission from qualifying purchases at no extra cost to you. We only recommend products we truly love and trust.
Welcome, dear readers! In this article, I will share more details about the topic we previously discussed: the baby romper and how to crochet it step-by-step to create a charming, handmade piece for your little ones.
As someone who is deeply passionate about baby crochet, in this article, I will dive into all the details of crafting a sweet crochet baby romper and overalls and help you, wonderful moms, stitch it step by step. I truly hope you find this article helpful and inspiring!
There is nothing quite as magical as creating a handmade garment for a little one. A crochet baby romper—also known as baby overalls or a onesie—is one of the most charming, practical, and cherished wardrobe pieces you can make. Whether you are preparing a heartwarming baby shower gift, crafting a cozy outfit for milestone baby photos, or dressing your own little bundle of joy, a handcrafted romper blends vintage charm with everyday practicality.
If you are a beginner who feels intimidated by shaped garments, armholes, or buttonholes, you are in the right place! This comprehensive guide simplifies the entire process into clear, easy-to-follow steps. With basic stitches, simple shaping techniques, and soft skin-friendly materials, you will easily create a boutique-quality baby romper that looks like it came straight from a high-end baby shop.

- Why a Crochet Baby Romper is the Ultimate Beginner Project
When beginner crafters think about crocheting baby clothing, they often worry about complex sizing, tight armhole shaping, or tedious sewing. However, a baby romper is actually one of the most forgiving and satisfying garments to craft for several compelling reasons:
Simple Geometric Construction: Unlike adult sweaters or tailored jackets, a classic baby romper is built using fundamental geometric shapes—primarily two soft rectangular panels or a single seamless continuous body tube that splits into leg openings.
Rapid Completion Rate: Because baby garments are small, you can finish a complete baby overalls outfit in just a few cozy evenings. This instant gratification builds confidence and keeps you motivated from the first chain stitch to the last.
Minimal Assembly Required: Modern beginner-friendly patterns focus on continuous row techniques and smart button placements, meaning you won’t have to deal with endless seams or complicated assembly steps.
High Perceived Value as a Gift: A handmade crochet romper is a standout gift at any baby shower. Parents deeply appreciate the time, care, and tactile softness that goes into a custom handcrafted outfit compared to store-bought synthetic clothes. - Selecting the Best Skin-Friendly Yarns & Essential Tools
A baby’s skin is extraordinarily delicate, thin, and prone to irritation. When crafting a baby romper, prioritizing fiber softness, breathability, and washability is far more important than picking colors alone.
A. Picking the Right Yarn Fiber
Cotton-Bamboo Blends: This is the absolute gold standard for baby apparel. Cotton provides structural integrity, breathability, and durability through repeated washings, while bamboo adds silk-like softness and natural antibacterial properties.
Superwash Merino Wool: Ideal for colder autumn and winter months. Superwash merino offers incredible warmth without scratchiness, and it can be gently machine washed without shrinking into felt.
Acrylic Blends (Baby Grade): If you prefer budget-friendly options, always look for premium low-pill acrylics specifically certified for babies.
👉 Click the link to check the price on Amazon
- B. Essential Tools & Hardware Checklist
To guarantee a smooth, frustration-free crafting experience, gather the following essential tools before starting your project: - Ergonomic Crochet Hooks (3.5 mm to 4.5 mm): Using an ergonomic hook with a soft rubber handle reduces hand fatigue and maintains even stitch tension throughout your project.
- Locking Stitch Markers: Crucial for marking leg openings, side seams, and shoulder strap positioning.
- Blunt Tapestry Needle: Essential for weaving in loose yarn ends securely so they don’t pop out after washing.
- Decorative Wooden Buttons: Smooth, natural wooden buttons add a charming rustic finish to the shoulder straps and crotch closure.
👉 Click the link to check the price on Amazon
👉 Click the link to check the price on Amazon

- Recommended Material Guide & Universal Baby Romper Sizing Chart
Having precise measurements ensures your baby overalls fit comfortably over diapers without feeling restrictive or overly baggy. Use the two WordPress-optimized tables below to select your materials and reference standard sizing parameters.
Recommended Material Guide (WordPress Responsive Table: 3×4)
| Material Category | Recommended Type | Key Benefit |
| Primary Fiber | Cotton-Bamboo Blend | Hypoallergenic, ultra-breathable, and gentle on sensitive newborn skin. |
| Yarn Weight | DK / Light Worsted (#3) | Provides optimal fabric drape without making the garment feel bulky or stiff. |
| Hook Size | 3.5 mm – 4.0 mm | Creates a soft, flexible fabric grid that keeps tiny fingers and toes safe. |
Universal Baby Romper Sizing Chart (WordPress Responsive Table: 5×6)
| Age Size | Chest Width | Body Length (Torso) | Inseam / Leg Depth | Approx. Yardage |
| Newborn (0-1M) | 8.5 inches | 11.0 inches | 2.0 inches | 220 – 250 Yards |
| 0 – 3 Months | 9.5 inches | 12.5 inches | 2.5 inches | 280 – 320 Yards |
| 3 – 6 Months | 10.5 inches | 14.0 inches | 3.0 inches | 350 – 400 Yards |
| 6 – 12 Months | 11.5 inches | 15.5 inches | 3.5 inches | 420 – 480 Yards |
| 12 – 18 Months | 12.5 inches | 17.0 inches | 4.0 inches | 500 – 560 Yards |
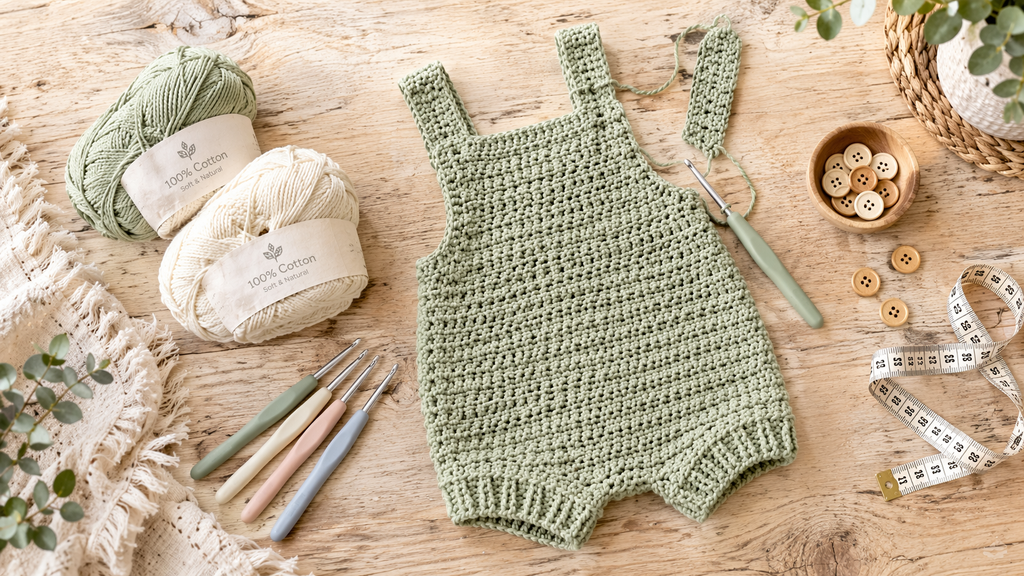
- Step-by-Step Crochet Baby Romper Pattern (Part A: Foundation & Main Body)
This pattern uses a combination of Single Crochet (SC) and Half Double Crochet (HDC) stitches to create a stretchy, breathable, and sturdy texture. We will begin from the bottom ribbing and work our way up through the main body torso. (Note: Instructions below are written for 0-3 Months size, with scaling for larger sizes noted in parentheses).
Step 1: Crafting the Elastic Waist/Leg Ribbing - Foundation Chain: Using your 4.0 mm ergonomic hook, chain 10 stitches (for the crotch/waist ribbing band).
- Row 1: Single Crochet (SC) in the 2nd chain from hook and in each chain across. Turn. (9 SC)
- Row 2 to 50: Chain 1, work Single Crochet in the Back Loops Only (BLO) across every stitch. Turn. This creates a stretchy, ribbed elastic texture that keeps the romper comfortable around the baby’s legs.
- Assembly of Ribbing Base: Once your ribbing strip measures approximately 19 inches stretched, bring the short ends together and slip stitch them to form a continuous flexible ring.
Step 2: Working the Lower Torso & Diaper Section - Round 1 (Foundation Pass): Chain 1, work 50 HDC stitches evenly along the edge of the ribbed ring you just created. Join with a slip stitch to the first HDC.
- Rounds 2 to 15 (Building Body Height): Chain 1, work 1 HDC in each stitch around. Join with a slip stitch. Continue working in continuous rounds until the piece measures approximately 6.5 inches from the bottom ribbing edge.
- Creating the Back & Front Split: Place two stitch markers evenly at stitches 1 and 25 to separate the front panel from the back panel.
- Step-by-Step Crochet Baby Romper Pattern ( Straps, Assembly & Edging)
Now that you have successfully completed the lower torso and diaper section, it is time to build the upper chest panel, shape the shoulder straps, and execute the final structural assembly. Take your time with these critical steps to ensure your baby overalls fit securely, look impeccably neat, and offer long-lasting durability through daily wear and active infant movement.
Step 3: Shaping the Upper Chest Panel and Armhole Curves - The Front Bib Section Foundation: Locate the 25 stitches designated for the front panel using your locking stitch markers. Attach your yarn securely at the right marker, chain 1, and work 1 Half Double Crochet (HDC) in each of the 25 stitches across the front. Turn your work carefully to start the next row.
- Decreasing for Ergonomic Armholes: To create a natural, comfortable contour for the baby’s underarms and prevent awkward bunching, work a gentle decrease at the beginning and the end of the next two consecutive rows (work 2 HDC together, or HDC2tog). This subtle shaping ensures the romper fits snugly against the baby’s chest without restricting arm movement.
- Height Progression and Stitch Consistency: Continue working straight rows of HDC without any further decreases until the front bib reaches the upper chest level—roughly 3 to 4 inches from the split line, depending on the sizing chart specifications. Fasten off your yarn, leaving a short tail to weave in later.
- The Back Panel Construction: Repeat a similar straight panel for the back section, but stop about 1 inch lower than the front panel height. This intentional height difference allows room for the adjustable shoulder straps to cross over comfortably at the back without pulling against the baby’s neck.
Step 4: Crafting and Attaching the Adjustable Shoulder Straps - Foundation Chain for Straps: At the top corner of the back panel, join your yarn securely and chain 35 to 40 stitches (the exact length depends on the baby’s size; longer chains provide extra length for button adjustments as the baby grows).
- Reinforcing the Strap Structure: Work 1 Single Crochet in the 2nd chain from the hook and in each chain back down to the base. Fasten off, leaving an 8-inch tail for sewing. Repeat this exact process for the second back corner so you have two matching, sturdy straps.
- Strap Placement and Custom Buttonhole Creation: Instead of struggling with traditional complex buttonholes, you can simply design the strap width so that a standard wooden button slides securely right between the crochet stitches, or make a small 2-chain loop at the very end of each strap. Pin the straps over the front bib temporarily to test the fit on a mockup before permanently securing them with your tapestry needle.
- Embellishments & Professional Finishing Touches
Elevating your handmade crochet baby romper from a standard basic craft project into a boutique-quality heirloom relies entirely on meticulous finishing techniques and clean hardware integration.
A. Securing the Crotch Opening with Functional Buttons
For maximum practicality during frequent diaper changes, adding a buttoned crotch opening is an absolute game-changer for parents: - Work a small, reinforced button flap extending from the back lower edge of the romper base.
- Attach 2 to 3 small, flat wooden or resin buttons securely along the inner front lower ribbing band.
- Ensure every single button is triple-knotted and reinforced with heavy-duty sewing thread to completely eliminate any choking hazards for curious toddlers who love pulling on clothing details.
B. Attaching Rustic Wooden Accents & Faux-Leather Tags
Polished Wooden Buttons: Stitch your natural wooden buttons onto the front upper bib where the shoulder straps attach. The visual contrast between the soft yarn texture and smooth polished wood creates an instant high-end boutique aesthetic.
Custom Branding Tags: Sew a small fold-over faux-leather tag reading “Handmade with Love” onto the lower side hem or front pocket. This tiny detail adds immense professional value if you plan to gift or sell your handmade creations.
👉 Click the link to check the price on Amazon
- Troubleshooting Common Beginner Mistakes & Expert Solutions
Even simple garment projects can present minor hurdles along the way. Here is how to diagnose, address, and fix the most common challenges encountered when making crochet baby rompers:
A. “The Romper Fabric Looks Too Rigid and Lacks Stretch”
The Diagnosis: If the finished fabric feels stiff and board-like, your stitch tension is far too tight, or your selected hook size is too small for the yarn weight.
The Solution: Unravel the rigid sections and increase your hook size by 0.5 mm or 1.0 mm. A looser, more relaxed tension creates a flexible, fluid fabric drape that moves naturally with an active infant.
B. “The Leg Openings Are Too Tight Around Baby Thighs”
The Diagnosis: Modern diapers add considerable bulk to an infant’s lower body. If you didn’t allow enough ease in the initial leg ribbing or round count, the openings will bind tightly and leave marks.
The Solution: Always measure the elastic band area around a standard disposable or cloth diaper reference. Go up 4 to 6 foundation stitches on your initial leg cuff chain to ensure a generous, comfortable stretch.
C. “My Shoulder Straps Keep Sliding Off the Baby’s Shoulders”
The Diagnosis: Straps placed too close to the outer edges of the shoulders will constantly slip off an infant’s naturally narrow frame.
The Solution: When attaching your straps to the back and front panels, angle them slightly inward toward the center chest by about 1 to 1.5 inches. This smart anatomical adjustment keeps the straps securely and comfortably centered in place all day long.

If you are just starting out and want a complete breakdown of all the basic equipment, be sure to check out our detailed guide on the 10 Essential Crochet Tools Every Beginner Needs for Making Baby Items (+ Size Chart).
Conclusion: Crafting Cherished Memories, One Stitch at a Time
Embarking on the journey to create your very first handmade crochet baby romper is far more than just a simple crafting project—it is an expression of deep love, patience, and creativity. Throughout this comprehensive guide, we have walked hand-in-hand through every essential phase: from selecting the absolute softest, baby-safe cotton-bamboo yarns and utilizing ergonomic tools, to mastering the foundational sizing charts and executing seamless structural assembly. By breaking down the process into manageable, beginner-friendly steps, you have discovered that crafting boutique-quality infant apparel is entirely within your reach, even if you are just starting out with your crochet hook.
Remember that minor imperfections in handmade items are never flaws; rather, they are the unique signature of artisanal craftsmanship that sets your creation apart from mass-produced garments. Every single row you stitch carries warmth, comfort, and a personal touch that new parents and growing babies will cherish for years to come. Now that you are fully equipped with the pattern, expert troubleshooting tips, and professional finishing techniques, it is time to turn inspiration into reality.
👉 Ready to begin your next rewarding project? Grab your favorite [Soft Baby Cotton Blend Yarn], pick up your [Ergonomic Crochet Hook Sets], and add those charming [Decorative Wooden Buttons for Crafts] to start stitching your very first adorable baby romper today! Thank you for trusting this guide, and happy crocheting!
I hope this article has been truly helpful and provided you with everything you need to know about crafting the perfect crochet baby romper. Now it’s your turn to pick up your hook, get creative, and enjoy every stitch of this special project!