Disclosure: This post contains affiliate links. As an Amazon Associate, we earn a small commission from qualifying purchases at no extra cost to you. We only recommend products we truly love and trust.
As someone who is passionate about children’s clothing and handmade crafts, in this article I will guide you through the steps of crocheting a baby cardigan and everything you need to know about making it. I hope you enjoy reading this article and find the information helpful and easy to follow.
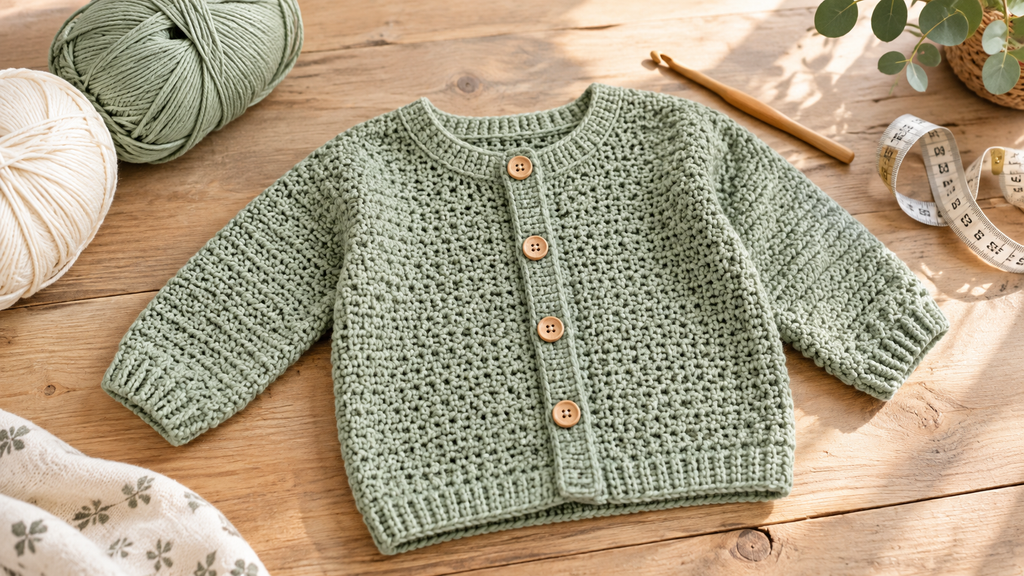
There is nothing quite as satisfying as stitching a cozy, adorable baby cardigan with your own hands. Whether you are preparing a heartfelt gift for a baby shower or making a charming addition to your little one’s wardrobe, creating wearable items is one of the most rewarding milestones for any crochet enthusiast.
If you have ever felt intimidated by complex garment assembly, sewing multiple panels together, or weaving in dozens of messy yarn tails, you are in the right place! The Seamless Top-Down Method completely removes the stress of sewing pieces together. You start from the neck collar and work your way down in one continuous piece, working the raglan increases to form the body and sleeves naturally.
In this beginner-friendly step-by-step tutorial, we break down every single stitch, sizing measurement, and finishing touch. By the end of this guide, you will be able to whip up a beautiful, soft, professional-looking baby cardigan with complete confidence—even if this is your very first garment project!
- Why the Seamless Method is Perfect for Beginners
When starting out with crochet garments, traditional patterns often ask you to make separate front panels, a back panel, and two separate sleeve pieces, which then need to be sewn together with a yarn needle. For beginners, this seaming step can lead to uneven seams, bulky joints, and mismatched armholes.

Here is why the Seamless Top-Down Method is a game-changer:
Zero Sewing Required: The entire body and raglan sleeves are worked as one continuous piece. Once you finish the main body, you simply join your yarn at the armholes to finish each sleeve in the round!
Easy Customization & Fit Check: Because you work from the top collar down, you can easily stop and measure the garment against a standard sizing chart or an existing baby onesie at any stage.
Fewer Yarn Ends to Weave In: Working continuously means fewer color cuts and fewer frustrating loose ends to hide at the end of your project.
Smooth & Comfortable for Baby: Without thick stitched seams inside the sweater, the garment stays completely flat, soft, and gentle against a newborn’s sensitive skin.
.Recommended Yarns, Tools & Essential Supplies
Using high-quality, soft, and easy-to-manage materials is key to a comfortable stitching process and a durable finished garment that withstands repeated washings.
Essential Supply Checklist:
- Soft, Baby-Safe Yarn (DK Weight / Light 3):
Babies have delicate skin that easily reacts to scratchy synthetic fibers or rough wools. Choose a buttery-soft cotton or hypoallergenic acrylic blend that is machine-washable.
🛒 Recommended Pick: Craft plush, non-scratchy garments with Soft Baby-Safe Cotton DK Yarn on Amazon. - Ergonomic Crochet Hook (4.0 mm / G-6):
An ergonomic hook with a soft silicone grip reduces hand fatigue and helps maintain consistent stitch tension throughout your project.
🛒 Recommended Pick: Keep your hands comfortable during long stitching sessions with Ergonomic Crochet Hooks with Rubber Grips on Amazon. - Natural Wooden Baby Buttons (15mm – 20mm):
Adding natural wooden buttons gives your cardigan a timeless, high-end handmade aesthetic.
🛒 Recommended Pick: Complete your cardigan with Smooth Natural Wooden Buttons on Amazon. - Stitch Markers: Absolutely essential for marking the four raglan corner points where you will perform increases.
- Flexible Tape Measure & Yarn Needle: For accurate sizing and weaving in loose ends.
- Baby Cardigan Sizing Chart (0 to 24 Months)
To ensure a comfortable, cozy fit with enough room for layers underneath, refer to this standardized measurement chart before chaining your base row:
| Size Range | Chest Circumference | Cardigan Length | Raglan Depth | Sleeve Length (Armpit to Wrist) |
| Preemie / Newborn | 14 in (35.5 cm) | 8 in (20.5 cm) | 3.5 in (9 cm) | 5 in (12.5 cm) |
| 0 – 3 Months | 16 in (40.5 cm) | 9.5 in (24 cm) | 4 in (10 cm) | 6 in (15 cm) |
| 3 – 6 Months | 18 in (45.5 cm) | 10.5 in (26.5 cm) | 4.5 in (11.5 cm) | 6.5 in (16.5 cm) |
| 6 – 12 Months | 20 in (51 cm) | 12 in (30.5 cm) | 5 in (12.5 cm) | 7.5 in (19 cm) |
| 12 – 18 Months | 21 in (53.5 cm) | 13 in (33 cm) | 5.25 in (13.5 cm) | 8.5 in (21.5 cm) |
| 18 – 24 Months | 22 in (56 cm) | 14 in (35.5 cm) | 5.5 in (14 cm) | 9.5 in (24 cm) |
- Step-by-Step Pattern Written Instructions (Part A: The Yoke)
This pattern uses standard US Crochet Terms. The following directions are written for Size 0-3 Months (with size adjustments easily made following the chart above).
Key Abbreviations:
Ch: Chain
St(s): Stitch(es)
Hdc: Half Double Crochet
Inc (Raglan Increase): Work [1 hdc, ch 2, 1 hdc] into the exact same chain-2 space.
Sl st: Slip Stitch
Step 1: Foundation Chain & Collar Setup
Chain 42 loosely using your 4.0 mm hook.
Row 1: Hdc in 3rd ch from hook (the initial ch-2 counts as 1 hdc). Hdc in next 5 sts (Left Front: 6 hdc), work [1 hdc, ch 2, 1 hdc] in next st (Corner 1). Hdc in next 6 sts (Left Sleeve: 6 hdc), work [1 hdc, ch 2, 1 hdc] in next st (Corner 2). Hdc in next 12 sts (Back Panel: 12 hdc), work [1 hdc, ch 2, 1 hdc] in next st (Corner 3). Hdc in next 6 sts (Right Sleeve: 6 hdc), work [1 hdc, ch 2, 1 hdc] in next st (Corner 4). Hdc in remaining 6 sts (Right Front: 6 hdc). Turn your work.
Step 2: Working the Raglan Yoke
Row 2: Ch 2 (counts as first hdc here and throughout), turn. Hdc in each st across to the first ch-2 space. In the ch-2 space, work [1 hdc, ch 2, 1 hdc] (Raglan Increase made). Hdc in each st to the next ch-2 space, work [1 hdc, ch 2, 1 hdc] in ch-2 space; repeat from * to * 2 more times. Hdc in each remaining st to the end of the row.
Rows 3 – 10: Repeat Row 2. With each row, your total stitch count increases by 8 stitches (2 stitches added per raglan corner). Continue repeating Row 2 until your yoke measures approximately 4 inches (10 cm) from the collar edge down to the corner, matching the required Raglan Depth for Size 0-3 Months.

Step 3: Dividing for Armholes (Underarm Join)
Once your yoke reaches the correct depth, you will fold the work and separate the sleeve stitches from the main body:
- Row 11: Ch 2, turn. Hdc in each st across the Left Front panel until you reach the first ch-2 corner space.
- Work 1 hdc directly into the first ch-2 space.
- Skip all sleeve stitches between Corner 1 and Corner 2 entirely.
- Chain 2 (this creates the underarm bridge for comfortable movement).
- Work 1 hdc directly into the second ch-2 corner space. (Your Left Sleeve loop is now isolated!)
- Hdc in each st across the Back Panel until you reach the third ch-2 corner space.
- Work 1 hdc into the third ch-2 space, ch 2, skip all right sleeve stitches, and work 1 hdc into the fourth ch-2 space.
- Hdc in each remaining st across the Right Front panel to the end. Turn.
Step 4: Working the Main Cardigan Body
Now that the armholes are divided, you will work straight across the front panels, underarm chains, and back panel as a single continuous piece:
Row 12: Ch 2, turn. Hdc in each stitch across, placing 2 hdc directly into each underarm chain-2 space.
Rows 13 – 22: Ch 2, turn. Hdc in every stitch across. Continue working back and forth in rows until the cardigan length measures 9.5 inches (24 cm) from the top shoulder down to the bottom hem (or your desired length). Fasten off yarn.
Step 5: Working the Seamless Sleeves in the Round
Rejoin yarn at the center of the underarm chain on one armhole:

Round 1: Ch 2 (counts as hdc), hdc 1 st into underarm space, hdc evenly in each stitch around the armhole opening, hdc 1 st in remaining underarm space. Join with a slip stitch to the top of the initial ch-2.
Rounds 2 – 12: Ch 2, turn your work (turning each round prevents the seam from slanting). Hdc in each st around. Join with a sl st to first hdc.
Round 13 (Cuff Decrease): Ch 2, turn. Hdc in next 2 sts, hdc2tog (hdc decrease); repeat from * around to create a slightly tapered cuff. Join.
Round 14: Work 1 round of Single Crochet (sc) into each stitch for a clean cuff edge. Fasten off. Repeat for the second sleeve.
.Adding the Button Bands, Ribbing & Finishing Touches
A clean border elevates a handmade sweater into a boutique-quality garment.
Left & Right Front Edging: Attach yarn to the bottom corner of the right front opening. Work single crochet stitches evenly up the vertical edge, around the neck collar, and down the left vertical edge.
Buttonhole Row: On the button side (e.g., Right Front), space out 3 to 4 buttonholes evenly:
To make a buttonhole: Ch 2, skip 1 stitch, sc in next stitch. (Adjust chain length to fit your chosen button size).
Attaching Buttons: Align your wooden buttons with the buttonholes on the opposite button band and sew them securely using a yarn needle and matching thread.
Beginner Troubleshooting & Common Cardigan Pitfalls

Issue 1: My Cardigan Edge is Crooked or Slanted
The Cause: Missing the very last stitch of a row or forgetting that the initial Ch-2 counts as a stitch.
The Fix: Place a stitch marker into the turning chain of every row so you never accidentally skip it when working back.
Issue 2: The Armholes Feel Too Tight for Baby’s Arms
The Cause: Dividing for armholes too early before the yoke reaches the full raglan depth.
The Fix: Always measure the diagonal length from the collar down to the raglan corner space before dividing. If it feels tight, add 1 or 2 extra increase rows to the yoke before step 3.
Issue 3: Gaps Under the Armpits
The Cause: Loose tension when joining the body across the underarm chains.
The Fix: When rejoining yarn for the sleeves, pick up an extra stitch loop between the body and the sleeve to close up any small gap naturally.
- Conclusion: Crafting Timeless Comfort, One Stitch at a Time
Mastering the Seamless Top-Down Method is a true game-changer for any beginner entering the world of handmade garments. By working from the collar down in one continuous piece, you completely bypass frustrating seams and messy assembly, leaving you with a beautifully finished, professional baby cardigan that is as comfortable as it is adorable.
As you work on your cardigan, remember these quick takeaways:
Prioritize Fiber Softness: Always choose gentle, hypoallergenic yarns to ensure complete comfort against delicate newborn skin.
Track Your Raglan Increases: Utilize stitch markers at all four corners to keep your yoke proportional and accurate.
Customize with Confidence: Check your dimensions against our sizing chart at each step for a flawless fit from 0 to 24 months.
With a little patience and basic stitches, you can create a cozy, boutique-quality heirloom that parents and babies will treasure for years to come.
Ready for Your Next Quick Baby Craft?
Looking for a fast, matching gift project? Pair your newborn cardigan with a cute, matching handmade toy! Head over to our step-by-step tutorial on 10 Easy Crochet Baby Rattle Patterns for Beginners to complete your ultimate DIY baby shower gift set!
I have now shared everything you need to know about this topic. I hope you found this article helpful and informative. Thank you so much for taking the time to read it.
Ce cardigan peut il être considéré comme une brassière et merci pour se tuto très bien expliqué.
Thank you so much, Catherine! Yes, absolutely, this cardigan design works wonderfully as a cozy baby brassière. I’m so glad you found the tutorial helpful!